MTE API Relay on AWS
Introduction
MTE API Relay protects HTTP traffic between server applications with two relays. Your service sends ordinary HTTP to an outbound relay, which encrypts each request and sends it to an inbound relay in front of the destination API. The inbound relay decrypts it, calls the API, and encrypts the response for the trip back.
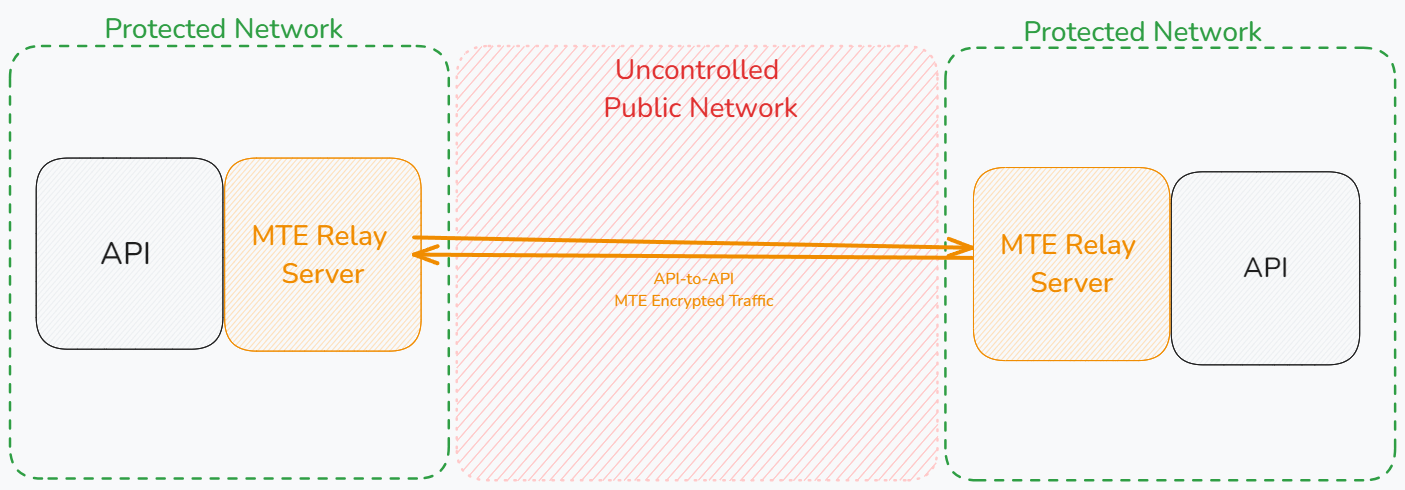
Both relays in the diagram are MTE API Relay instances. The outbound relay sits next to the calling API and the inbound relay next to the target API.
Both relays of a chain run the MTE API Relay image, which pairs only with another MTE API Relay. It cannot pair with an MTE Relay Server or with the client libraries. v5 relays pair only with v5 relays; see Upgrading from v4.
This page runs the AWS Marketplace image on Amazon ECS, with the inbound relay managed by the control plane, and covers Amazon EKS. The Marketplace image is the same relay as the on premise image, with two differences:
- AWS bills it through your AWS account. Every container started from it registers with AWS Marketplace metering when it starts, and the subscription is the license.
- It runs only on Amazon ECS, including AWS Fargate, and on Amazon EKS. For any other runtime, use the on premise image.
Quick deploy
AWS Quick Deploy builds the inbound side from about ten answers. On Amazon ECS it gives you a Launch Stack button that opens AWS CloudFormation with every answer filled in; on Amazon EKS it gives you one script to paste into a shell. The control plane starts with your inbound host already configured, so there is no setup wizard. The outbound relay still runs next to your calling service.
Open AWS Quick DeployPrerequisites
Technical Requirements
- Two services that use HTTP to communicate with each other.
- An AWS account subscribed to MTE API Relay on AWS Marketplace for each side that runs a relay. See Subscribe on AWS Marketplace.
- The AWS CLI v2, signed in to that account.
- A VPC with subnets in two or more Availability Zones that reach the
internet, through a public IP or a NAT gateway. Tasks pull the image from the
Marketplace registry in
us-east-1and call AWS Marketplace metering when they start. The tasks can run in any commercial Region where AWS Marketplace metering is available; each task registers in its own Region.
Skills and Knowledge
- Familiarity with ECS and/or EKS.
- Experience with the AWS CLI.
- General familiarity with AWS services.
Subscribe on AWS Marketplace
- Open the MTE API Relay listing and choose View purchase options.
- Accept the terms. The subscription becomes active within a few minutes.
- The image is
709825985650.dkr.ecr.us-east-1.amazonaws.com/eclypses/mar-hoc:5.0.5. Subscribers can pull every tag in that repository, including releases newer than the version the listing page shows.
Check that your account can pull it:
- bash
- PowerShell
aws ecr batch-get-image --region us-east-1 \
  --registry-id 709825985650 \
  --repository-name eclypses/mar-hoc \
  --image-ids imageTag=5.0.5 \
  --query 'images[0].imageId'
aws ecr batch-get-image --region us-east-1 `
  --registry-id 709825985650 `
  --repository-name eclypses/mar-hoc `
  --image-ids imageTag=5.0.5 `
  --query 'images[0].imageId'
The answer is the image digest and tag. An account without an active
subscription gets AccessDeniedException with
You are not entitled to pull this AWS Marketplace product image.
Subscribers can pull from the repository but not list it, so
aws ecr describe-images answers AccessDeniedException too.
How the Marketplace image starts
Every container started from the Marketplace image, inbound relay, outbound
relay, or control plane, calls the AWS Marketplace RegisterUsage API once at
startup with its task's IAM role. It does this before it binds the relay port.
- On success it logs
Billing manager initialized for startup RegisterUsagewith the product code, and starts. - On failure it logs the AWS error, then
Startup RegisterUsage failed; shutting down without becoming ready, and exits with code 1 before it serves anything. ECS starts a replacement, so a missing permission looks like tasks that stop within seconds of starting. See Troubleshooting.
AWS bills each running container at the listing's container hour price, in the account that runs it. The control plane is a container like any relay task, so one outbound relay, one inbound relay, and the inbound side's control plane are three containers.
The subscription is the license. Leave COMPANY_NAME and LICENSE_KEY unset,
and leave the License step of the setup wizard empty.
Deploy on Amazon ECS
AWS Quick Deploy builds steps 1 to 9 of this walkthrough as one CloudFormation stack, with your inbound host already configured. The steps below build it by hand.
This walkthrough builds the inbound side first: a control plane and an inbound relay service on AWS Fargate in one cluster, in front of your API. The inbound relay tasks reach the control plane through ECS Service Connect, the control plane keeps its configuration on Amazon EFS, the two shared secrets live in SSM Parameter Store, and an Application Load Balancer with TLS receives the encrypted traffic. The outbound relay then runs next to your calling service. For production, add the pieces in Production architecture.
your service --> outbound relay --HTTPS--> load balancer --> inbound relay tasks :8080 --> your API
                                                               |
                                                               | poll every 3 s, Service Connect
                                                               v
                                                             control plane :8081 --> EFS
Every command block has a bash tab and a PowerShell tab; the choice
applies to every block on this page and on the other deployment pages. The
bash commands run on Linux, macOS, WSL, or Git Bash, and use openssl. The
PowerShell commands run in PowerShell 7 or Windows PowerShell 5.1 and write
the JSON and YAML that the AWS CLI and kubectl read to files in the current
directory. Run a walkthrough in one shell session, because later steps use the
variables its first block sets. Set these first:
- bash
- PowerShell
export AWS_REGION=us-east-2                          # Update this value!
ACCOUNT=$(aws sts get-caller-identity --query Account --output text)
VPC=vpc-0123456789abcdef0                            # Update this value!
SUBNETS=subnet-0123456789abcdef0,subnet-0fedcba9876543210  # Update this value!
IMAGE=709825985650.dkr.ecr.us-east-1.amazonaws.com/eclypses/mar-hoc:5.0.5
CERT_ARN=arn:aws:acm:us-east-2:111122223333:certificate/00000000-0000-0000-0000-000000000000  # Update this value!
CALLER_CIDR=203.0.113.0/24   # Update this value! The outbound relay's egress addresses
In Git Bash on Windows, run export MSYS_NO_PATHCONV=1 first. Otherwise
Git Bash rewrites arguments that start with /, such as /ecs/mte-api-relay,
into Windows paths, and the AWS CLI rejects them.
$env:AWS_REGION = 'us-east-2'                        # Update this value!
$ACCOUNT = aws sts get-caller-identity --query Account --output text
$VPC = 'vpc-0123456789abcdef0'                       # Update this value!
$SUBNETS = 'subnet-0123456789abcdef0,subnet-0fedcba9876543210'  # Update this value!
$IMAGE = '709825985650.dkr.ecr.us-east-1.amazonaws.com/eclypses/mar-hoc:5.0.5'
$CERT_ARN = 'arn:aws:acm:us-east-2:111122223333:certificate/00000000-0000-0000-0000-000000000000'  # Update this value!
$CALLER_CIDR = '203.0.113.0/24'   # Update this value! The outbound relay's egress addresses
Keep the braces in ${ACCOUNT} and ${env:AWS_REGION} when you edit a
here-string: without them PowerShell reads $ACCOUNT:role as a variable
named role in a scope named ACCOUNT. JSON arguments go through files
because PowerShell before 7.3 strips the quotes from inline JSON before the
AWS CLI sees it.
1. Create the IAM roles
The task execution role lets ECS pull the image, write logs, and read the two
secrets. The task role lets the containers call RegisterUsage.
- bash
- PowerShell
cat > ecs-tasks-trust.json <<'EOF'
{"Version": "2012-10-17", "Statement": [{"Effect": "Allow", "Principal": {"Service": "ecs-tasks.amazonaws.com"}, "Action": "sts:AssumeRole"}]}
EOF

aws iam create-role --role-name mte-api-relay-execution \
  --assume-role-policy-document file://ecs-tasks-trust.json
aws iam attach-role-policy --role-name mte-api-relay-execution \
  --policy-arn arn:aws:iam::aws:policy/service-role/AmazonECSTaskExecutionRolePolicy
aws iam put-role-policy --role-name mte-api-relay-execution \
  --policy-name read-mte-api-relay-parameters \
  --policy-document "{\"Version\": \"2012-10-17\", \"Statement\": [{\"Effect\": \"Allow\", \"Action\": \"ssm:GetParameters\", \"Resource\": \"arn:aws:ssm:$AWS_REGION:$ACCOUNT:parameter/mte-api-relay/*\"}]}"

aws iam create-role --role-name mte-api-relay-task \
  --assume-role-policy-document file://ecs-tasks-trust.json
aws iam attach-role-policy --role-name mte-api-relay-task \
  --policy-arn arn:aws:iam::aws:policy/AWSMarketplaceMeteringRegisterUsage
@'
{"Version": "2012-10-17", "Statement": [{"Effect": "Allow", "Principal": {"Service": "ecs-tasks.amazonaws.com"}, "Action": "sts:AssumeRole"}]}
'@ | Set-Content ecs-tasks-trust.json
@"
{"Version": "2012-10-17", "Statement": [{"Effect": "Allow", "Action": "ssm:GetParameters", "Resource": "arn:aws:ssm:${env:AWS_REGION}:${ACCOUNT}:parameter/mte-api-relay/*"}]}
"@ | Set-Content read-mte-api-relay-parameters.json

aws iam create-role --role-name mte-api-relay-execution `
  --assume-role-policy-document file://ecs-tasks-trust.json
aws iam attach-role-policy --role-name mte-api-relay-execution `
  --policy-arn arn:aws:iam::aws:policy/service-role/AmazonECSTaskExecutionRolePolicy
aws iam put-role-policy --role-name mte-api-relay-execution `
  --policy-name read-mte-api-relay-parameters `
  --policy-document file://read-mte-api-relay-parameters.json

aws iam create-role --role-name mte-api-relay-task `
  --assume-role-policy-document file://ecs-tasks-trust.json
aws iam attach-role-policy --role-name mte-api-relay-task `
  --policy-arn arn:aws:iam::aws:policy/AWSMarketplaceMeteringRegisterUsage
The managed execution policy already allows pulls from the Marketplace registry, so the execution role needs nothing else for the image.
2. Store the shared secrets
- bash
- PowerShell
aws ssm put-parameter --name /mte-api-relay/control-plane-token \
  --type SecureString --value "$(openssl rand -hex 32)"
aws ssm put-parameter --name /mte-api-relay/admin-password \
  --type SecureString --value "$(openssl rand -hex 24)"
$b = New-Object byte[] 32; [Security.Cryptography.RandomNumberGenerator]::Create().GetBytes($b)
$TOKEN = -join ($b | ForEach-Object { $_.ToString('x2') })
$b = New-Object byte[] 24; [Security.Cryptography.RandomNumberGenerator]::Create().GetBytes($b)
$ADMIN_PW = -join ($b | ForEach-Object { $_.ToString('x2') })
aws ssm put-parameter --name /mte-api-relay/control-plane-token `
  --type SecureString --value $TOKEN
aws ssm put-parameter --name /mte-api-relay/admin-password `
  --type SecureString --value $ADMIN_PW
The control plane and every inbound relay task read CONTROL_PLANE_TOKEN from
the first parameter. Only the control plane reads ADMIN_PW from the second.
Each relay sends the token in an HTTP header, so a token that ends in a newline
fails every poll. That happens when a value comes from a file through
file://; see Troubleshooting.
3. Create the security groups and the file system
- bash
- PowerShell
sg() { aws ec2 create-security-group --vpc-id $VPC --group-name $1 \
  --description "$1" --query GroupId --output text; }
SG_ALB=$(sg mte-api-relay-load-balancer)
SG_RELAY=$(sg mte-api-relay-inbound)
SG_CP=$(sg mte-api-relay-control-plane)
SG_EFS=$(sg mte-api-relay-efs)

aws ec2 authorize-security-group-ingress --group-id $SG_ALB --protocol tcp --port 443 --cidr $CALLER_CIDR
aws ec2 authorize-security-group-ingress --group-id $SG_RELAY --protocol tcp --port 8080 --source-group $SG_ALB
aws ec2 authorize-security-group-ingress --group-id $SG_RELAY --protocol tcp --port 9091 --source-group $SG_ALB
aws ec2 authorize-security-group-ingress --group-id $SG_CP --protocol tcp --port 8081 --source-group $SG_RELAY
aws ec2 authorize-security-group-ingress --group-id $SG_EFS --protocol tcp --port 2049 --source-group $SG_CP
function New-Sg($name) {
  aws ec2 create-security-group --vpc-id $VPC --group-name $name `
    --description $name --query GroupId --output text
}
$SG_ALB = New-Sg mte-api-relay-load-balancer
$SG_RELAY = New-Sg mte-api-relay-inbound
$SG_CP = New-Sg mte-api-relay-control-plane
$SG_EFS = New-Sg mte-api-relay-efs

aws ec2 authorize-security-group-ingress --group-id $SG_ALB --protocol tcp --port 443 --cidr $CALLER_CIDR
aws ec2 authorize-security-group-ingress --group-id $SG_RELAY --protocol tcp --port 8080 --source-group $SG_ALB
aws ec2 authorize-security-group-ingress --group-id $SG_RELAY --protocol tcp --port 9091 --source-group $SG_ALB
aws ec2 authorize-security-group-ingress --group-id $SG_CP --protocol tcp --port 8081 --source-group $SG_RELAY
aws ec2 authorize-security-group-ingress --group-id $SG_EFS --protocol tcp --port 2049 --source-group $SG_CP
Only the outbound relay calls the inbound side, so open 443 to its egress addresses, such as the calling side's NAT gateway, instead of the whole internet. Port 9091 is the probe listener, open only to the load balancer health check. Port 8081, the panel and the worker API, is open only to the inbound relay tasks.
The control plane needs a writable, persistent CONTROL_PLANE_DATA_DIR. The
image runs as the unprivileged user 65532, so the EFS access point creates its
directory owned by that user:
- bash
- PowerShell
EFS=$(aws efs create-file-system --encrypted --creation-token mte-api-relay-control-plane \
  --query FileSystemId --output text)
until [ "$(aws efs describe-file-systems --file-system-id $EFS \
  --query 'FileSystems[0].LifeCycleState' --output text)" = available ]; do sleep 5; done
for s in ${SUBNETS//,/ }; do
  aws efs create-mount-target --file-system-id $EFS --subnet-id $s --security-groups $SG_EFS
done
until [ -z "$(aws efs describe-mount-targets --file-system-id $EFS \
  --query 'MountTargets[?LifeCycleState!=`available`].MountTargetId' --output text)" ]; do sleep 10; done
EFS_AP=$(aws efs create-access-point --file-system-id $EFS \
  --posix-user Uid=65532,Gid=65532 \
  --root-directory 'Path=/control-plane,CreationInfo={OwnerUid=65532,OwnerGid=65532,Permissions=0750}' \
  --query AccessPointId --output text)
$EFS = aws efs create-file-system --encrypted --creation-token mte-api-relay-control-plane `
  --query FileSystemId --output text
while ((aws efs describe-file-systems --file-system-id $EFS `
  --query 'FileSystems[0].LifeCycleState' --output text) -ne 'available') { Start-Sleep 5 }
foreach ($s in $SUBNETS -split ',') {
  aws efs create-mount-target --file-system-id $EFS --subnet-id $s --security-groups $SG_EFS
}
while (aws efs describe-mount-targets --file-system-id $EFS `
  --query 'MountTargets[?LifeCycleState!=`available`].MountTargetId' --output text) { Start-Sleep 10 }
$EFS_AP = aws efs create-access-point --file-system-id $EFS `
  --posix-user 'Uid=65532,Gid=65532' `
  --root-directory 'Path=/control-plane,CreationInfo={OwnerUid=65532,OwnerGid=65532,Permissions=0750}' `
  --query AccessPointId --output text
Turn on automatic daily backups of the file system:
- bash
- PowerShell
aws efs put-backup-policy --file-system-id $EFS --backup-policy Status=ENABLED
aws efs put-backup-policy --file-system-id $EFS --backup-policy Status=ENABLED
The stored configuration and its history survive task replacements on EFS. Where the control plane keeps its settings shows how the path maps.
4. Create the cluster and the log group
- bash
- PowerShell
aws ecs create-cluster --cluster-name mte-api-relay --service-connect-defaults namespace=mte-api-relay
aws logs create-log-group --log-group-name /ecs/mte-api-relay
aws logs put-retention-policy --log-group-name /ecs/mte-api-relay --retention-in-days 30
until [ "$(aws ecs describe-clusters --clusters mte-api-relay \
  --query 'clusters[0].status' --output text)" = ACTIVE ]; do sleep 10; done
aws ecs create-cluster --cluster-name mte-api-relay --service-connect-defaults namespace=mte-api-relay
aws logs create-log-group --log-group-name /ecs/mte-api-relay
aws logs put-retention-policy --log-group-name /ecs/mte-api-relay --retention-in-days 30
while ((aws ecs describe-clusters --clusters mte-api-relay `
  --query 'clusters[0].status' --output text) -ne 'ACTIVE') { Start-Sleep 10 }
The cluster creates an AWS Cloud Map namespace for Service Connect and stays
PROVISIONING until it exists, which can take a few minutes. Creating a
service before the cluster is ACTIVE fails with ClusterNotFoundException.
The retention policy keeps 30 days of logs; a log group without one keeps
every line forever and bills for it.
5. Register the task definitions
- bash
- PowerShell
cat > control-plane.json <<EOF
{
  "family": "mte-api-relay-control-plane",
  "networkMode": "awsvpc",
  "requiresCompatibilities": ["FARGATE"],
  "runtimePlatform": {"cpuArchitecture": "X86_64", "operatingSystemFamily": "LINUX"},
  "cpu": "256",
  "memory": "512",
  "executionRoleArn": "arn:aws:iam::$ACCOUNT:role/mte-api-relay-execution",
  "taskRoleArn": "arn:aws:iam::$ACCOUNT:role/mte-api-relay-task",
  "containerDefinitions": [{
    "name": "control-plane",
    "image": "$IMAGE",
    "essential": true,
    "readonlyRootFilesystem": true,
    "portMappings": [{"name": "panel", "containerPort": 8081, "protocol": "tcp", "appProtocol": "http"}],
    "environment": [
      {"name": "MODE", "value": "control"},
      {"name": "LISTEN_PORT", "value": "8081"},
      {"name": "CONTROL_PLANE_DATA_DIR", "value": "/data"}
    ],
    "secrets": [
      {"name": "CONTROL_PLANE_TOKEN", "valueFrom": "arn:aws:ssm:$AWS_REGION:$ACCOUNT:parameter/mte-api-relay/control-plane-token"},
      {"name": "ADMIN_PW", "valueFrom": "arn:aws:ssm:$AWS_REGION:$ACCOUNT:parameter/mte-api-relay/admin-password"}
    ],
    "mountPoints": [{"sourceVolume": "control-plane-data", "containerPath": "/data"}],
    "logConfiguration": {"logDriver": "awslogs", "options": {"awslogs-group": "/ecs/mte-api-relay", "awslogs-region": "$AWS_REGION", "awslogs-stream-prefix": "control-plane"}}
  }],
  "volumes": [{
    "name": "control-plane-data",
    "efsVolumeConfiguration": {"fileSystemId": "$EFS", "transitEncryption": "ENABLED", "authorizationConfig": {"accessPointId": "$EFS_AP", "iam": "DISABLED"}}
  }]
}
EOF

cat > inbound.json <<EOF
{
  "family": "mte-api-relay-inbound",
  "networkMode": "awsvpc",
  "requiresCompatibilities": ["FARGATE"],
  "runtimePlatform": {"cpuArchitecture": "X86_64", "operatingSystemFamily": "LINUX"},
  "cpu": "512",
  "memory": "1024",
  "executionRoleArn": "arn:aws:iam::$ACCOUNT:role/mte-api-relay-execution",
  "taskRoleArn": "arn:aws:iam::$ACCOUNT:role/mte-api-relay-task",
  "containerDefinitions": [{
    "name": "relay",
    "image": "$IMAGE",
    "essential": true,
    "readonlyRootFilesystem": true,
    "stopTimeout": 45,
    "portMappings": [
      {"name": "relay", "containerPort": 8080, "protocol": "tcp", "appProtocol": "http"},
      {"name": "probe", "containerPort": 9091, "protocol": "tcp"}
    ],
    "environment": [
      {"name": "CONTROL_PLANE_URL", "value": "http://control-plane:8081"}
    ],
    "secrets": [
      {"name": "CONTROL_PLANE_TOKEN", "valueFrom": "arn:aws:ssm:$AWS_REGION:$ACCOUNT:parameter/mte-api-relay/control-plane-token"}
    ],
    "logConfiguration": {"logDriver": "awslogs", "options": {"awslogs-group": "/ecs/mte-api-relay", "awslogs-region": "$AWS_REGION", "awslogs-stream-prefix": "inbound"}}
  }]
}
EOF

aws ecs register-task-definition --cli-input-json file://control-plane.json
aws ecs register-task-definition --cli-input-json file://inbound.json
@"
{
  "family": "mte-api-relay-control-plane",
  "networkMode": "awsvpc",
  "requiresCompatibilities": ["FARGATE"],
  "runtimePlatform": {"cpuArchitecture": "X86_64", "operatingSystemFamily": "LINUX"},
  "cpu": "256",
  "memory": "512",
  "executionRoleArn": "arn:aws:iam::${ACCOUNT}:role/mte-api-relay-execution",
  "taskRoleArn": "arn:aws:iam::${ACCOUNT}:role/mte-api-relay-task",
  "containerDefinitions": [{
    "name": "control-plane",
    "image": "${IMAGE}",
    "essential": true,
    "readonlyRootFilesystem": true,
    "portMappings": [{"name": "panel", "containerPort": 8081, "protocol": "tcp", "appProtocol": "http"}],
    "environment": [
      {"name": "MODE", "value": "control"},
      {"name": "LISTEN_PORT", "value": "8081"},
      {"name": "CONTROL_PLANE_DATA_DIR", "value": "/data"}
    ],
    "secrets": [
      {"name": "CONTROL_PLANE_TOKEN", "valueFrom": "arn:aws:ssm:${env:AWS_REGION}:${ACCOUNT}:parameter/mte-api-relay/control-plane-token"},
      {"name": "ADMIN_PW", "valueFrom": "arn:aws:ssm:${env:AWS_REGION}:${ACCOUNT}:parameter/mte-api-relay/admin-password"}
    ],
    "mountPoints": [{"sourceVolume": "control-plane-data", "containerPath": "/data"}],
    "logConfiguration": {"logDriver": "awslogs", "options": {"awslogs-group": "/ecs/mte-api-relay", "awslogs-region": "${env:AWS_REGION}", "awslogs-stream-prefix": "control-plane"}}
  }],
  "volumes": [{
    "name": "control-plane-data",
    "efsVolumeConfiguration": {"fileSystemId": "${EFS}", "transitEncryption": "ENABLED", "authorizationConfig": {"accessPointId": "${EFS_AP}", "iam": "DISABLED"}}
  }]
}
"@ | Set-Content control-plane.json

@"
{
  "family": "mte-api-relay-inbound",
  "networkMode": "awsvpc",
  "requiresCompatibilities": ["FARGATE"],
  "runtimePlatform": {"cpuArchitecture": "X86_64", "operatingSystemFamily": "LINUX"},
  "cpu": "512",
  "memory": "1024",
  "executionRoleArn": "arn:aws:iam::${ACCOUNT}:role/mte-api-relay-execution",
  "taskRoleArn": "arn:aws:iam::${ACCOUNT}:role/mte-api-relay-task",
  "containerDefinitions": [{
    "name": "relay",
    "image": "${IMAGE}",
    "essential": true,
    "readonlyRootFilesystem": true,
    "stopTimeout": 45,
    "portMappings": [
      {"name": "relay", "containerPort": 8080, "protocol": "tcp", "appProtocol": "http"},
      {"name": "probe", "containerPort": 9091, "protocol": "tcp"}
    ],
    "environment": [
      {"name": "CONTROL_PLANE_URL", "value": "http://control-plane:8081"}
    ],
    "secrets": [
      {"name": "CONTROL_PLANE_TOKEN", "valueFrom": "arn:aws:ssm:${env:AWS_REGION}:${ACCOUNT}:parameter/mte-api-relay/control-plane-token"}
    ],
    "logConfiguration": {"logDriver": "awslogs", "options": {"awslogs-group": "/ecs/mte-api-relay", "awslogs-region": "${env:AWS_REGION}", "awslogs-stream-prefix": "inbound"}}
  }]
}
"@ | Set-Content inbound.json

aws ecs register-task-definition --cli-input-json file://control-plane.json
aws ecs register-task-definition --cli-input-json file://inbound.json
MODE=controlturns the same image into the control plane.http://control-plane:8081is the Service Connect name the control plane service publishes in step 7. Inbound relay tasks carry noDOMAIN_MAP; they wait for the configuration you save in step 8.stopTimeoutis aboveDRAIN_SECONDS, 30 by default, so a stopping relay finishes its requests in flight. See Keepalive and timeouts.readonlyRootFilesystemmakes the container's own file system read only. The control plane writes only under/data, the EFS volume, and the relay writes nothing, so neither needs a writable root.- There is no container health check, because the image is distroless and has no shell to run one. The load balancer checks the inbound relay tasks instead.
- The sizes match the tested MTE Relay Server walkthrough. Size the relay tasks for your traffic with Limits and scaling.
6. Create the load balancer
- bash
- PowerShell
ALB=$(aws elbv2 create-load-balancer --name mte-api-relay --type application \
  --scheme internet-facing --subnets ${SUBNETS//,/ } --security-groups $SG_ALB \
  --query 'LoadBalancers[0].LoadBalancerArn' --output text)
TG=$(aws elbv2 create-target-group --name mte-api-relay --protocol HTTP --port 8080 \
  --vpc-id $VPC --target-type ip \
  --health-check-port 9091 --health-check-path /readyz \
  --health-check-interval-seconds 10 --healthy-threshold-count 2 \
  --query 'TargetGroups[0].TargetGroupArn' --output text)
aws elbv2 modify-target-group-attributes --target-group-arn $TG \
  --attributes Key=deregistration_delay.timeout_seconds,Value=60
aws elbv2 modify-load-balancer-attributes --load-balancer-arn $ALB \
  --attributes Key=routing.http.drop_invalid_header_fields.enabled,Value=true
aws elbv2 create-listener --load-balancer-arn $ALB --protocol HTTPS --port 443 \
  --ssl-policy ELBSecurityPolicy-TLS13-1-2-2021-06 \
  --certificates CertificateArn=$CERT_ARN \
  --default-actions Type=forward,TargetGroupArn=$TG
aws elbv2 describe-load-balancers --load-balancer-arns $ALB \
  --query 'LoadBalancers[0].DNSName' --output text
$ALB = aws elbv2 create-load-balancer --name mte-api-relay --type application `
  --scheme internet-facing --subnets ($SUBNETS -split ',') --security-groups $SG_ALB `
  --query 'LoadBalancers[0].LoadBalancerArn' --output text
$TG = aws elbv2 create-target-group --name mte-api-relay --protocol HTTP --port 8080 `
  --vpc-id $VPC --target-type ip `
  --health-check-port 9091 --health-check-path /readyz `
  --health-check-interval-seconds 10 --healthy-threshold-count 2 `
  --query 'TargetGroups[0].TargetGroupArn' --output text
aws elbv2 modify-target-group-attributes --target-group-arn $TG `
  --attributes 'Key=deregistration_delay.timeout_seconds,Value=60'
aws elbv2 modify-load-balancer-attributes --load-balancer-arn $ALB `
  --attributes 'Key=routing.http.drop_invalid_header_fields.enabled,Value=true'
aws elbv2 create-listener --load-balancer-arn $ALB --protocol HTTPS --port 443 `
  --ssl-policy ELBSecurityPolicy-TLS13-1-2-2021-06 `
  --certificates "CertificateArn=$CERT_ARN" `
  --default-actions "Type=forward,TargetGroupArn=$TG"
aws elbv2 describe-load-balancers --load-balancer-arns $ALB `
  --query 'LoadBalancers[0].DNSName' --output text
Point the inbound relay's hostname, for example inbound-relay.example.com,
at the DNS name the last command prints. CERT_ARN is an ACM certificate for
that name, in the same Region. The target group sends traffic to port 8080 and
checks GET /readyz on port 9091, which answers 200 only while a relay task
serves. The faster health check marks a new task healthy in about 20 seconds
instead of two and a half minutes, and the 60 second deregistration delay,
above DRAIN_SECONDS, cuts a rolling restart from more than eight minutes to
about four. The listener's security policy accepts TLS 1.2 and 1.3 only; the
default policy still accepts TLS 1.0 and 1.1. The load balancer removes HTTP
headers with invalid names instead of forwarding them. When the outbound relay
runs in the same VPC, an internal load balancer works too.
Keep the idle timeout at its default of 60 seconds unless routes stream; see
Keepalive and timeouts.
7. Start the control plane
- bash
- PowerShell
aws ecs create-service --cluster mte-api-relay --service-name control-plane \
  --task-definition mte-api-relay-control-plane --desired-count 1 --launch-type FARGATE \
  --deployment-configuration minimumHealthyPercent=0,maximumPercent=100 \
  --network-configuration "awsvpcConfiguration={subnets=[$SUBNETS],securityGroups=[$SG_CP],assignPublicIp=ENABLED}" \
  --service-connect-configuration '{"enabled": true, "namespace": "mte-api-relay", "services": [{"portName": "panel", "discoveryName": "control-plane", "clientAliases": [{"port": 8081, "dnsName": "control-plane"}]}]}'
@'
{"enabled": true, "namespace": "mte-api-relay", "services": [{"portName": "panel", "discoveryName": "control-plane", "clientAliases": [{"port": 8081, "dnsName": "control-plane"}]}]}
'@ | Set-Content control-plane-service-connect.json
aws ecs create-service --cluster mte-api-relay --service-name control-plane `
  --task-definition mte-api-relay-control-plane --desired-count 1 --launch-type FARGATE `
  --deployment-configuration 'minimumHealthyPercent=0,maximumPercent=100' `
  --network-configuration "awsvpcConfiguration={subnets=[$SUBNETS],securityGroups=[$SG_CP],assignPublicIp=ENABLED}" `
  --service-connect-configuration file://control-plane-service-connect.json
- Run exactly one control plane task.
minimumHealthyPercent=0andmaximumPercent=100stop the old task before a new one starts, so two control planes never write the same files. Relay tasks keep serving their last configuration while it restarts. assignPublicIp=ENABLEDis for public subnets. In private subnets with a NAT gateway, useDISABLED.
8. Sign in and run the setup wizard
The panel listens on port 8081 of the control plane task, which only the inbound relay tasks can reach. In production, reach it over a VPN, AWS Client VPN, or a bastion host, and never through the load balancer. For a first setup from a public subnet, open 8081 to your own address and find the task's public IP:
- bash
- PowerShell
aws ecs wait services-stable --cluster mte-api-relay --services control-plane
aws ec2 authorize-security-group-ingress --group-id $SG_CP --protocol tcp \
  --port 8081 --cidr "$(curl -s https://checkip.amazonaws.com)/32"
TASK=$(aws ecs list-tasks --cluster mte-api-relay --service-name control-plane \
  --query 'taskArns[0]' --output text)
ENI=$(aws ecs describe-tasks --cluster mte-api-relay --tasks $TASK \
  --query 'tasks[0].attachments[?type==`ElasticNetworkInterface`].details[]|[?name==`networkInterfaceId`].value|[0]' \
  --output text)
aws ec2 describe-network-interfaces --network-interface-ids $ENI \
  --query 'NetworkInterfaces[0].Association.PublicIp' --output text
aws ssm get-parameter --name /mte-api-relay/admin-password --with-decryption \
  --query Parameter.Value --output text
aws ecs wait services-stable --cluster mte-api-relay --services control-plane
$MY_IP = (Invoke-RestMethod https://checkip.amazonaws.com).Trim()
aws ec2 authorize-security-group-ingress --group-id $SG_CP --protocol tcp `
  --port 8081 --cidr "$MY_IP/32"
$TASK = aws ecs list-tasks --cluster mte-api-relay --service-name control-plane `
  --query 'taskArns[0]' --output text
$ENI = aws ecs describe-tasks --cluster mte-api-relay --tasks $TASK `
  --query 'tasks[0].attachments[?type==`ElasticNetworkInterface`].details[]|[?name==`networkInterfaceId`].value|[0]' `
  --output text
aws ec2 describe-network-interfaces --network-interface-ids $ENI `
  --query 'NetworkInterfaces[0].Association.PublicIp' --output text
aws ssm get-parameter --name /mte-api-relay/admin-password --with-decryption `
  --query Parameter.Value --output text
Open http://<public-ip>:8081 and sign in as admin with the password the
last command prints. Choose Start setup and follow
the setup wizard:
- License: leave both fields empty. The subscription is the license.
- Hosts: enter the hostname the outbound relay calls,
inbound-relay.example.comin this example, and your API's URL as its destination. - Advanced: set
TRUSTED_PROXIESto the CIDRs of the load balancer's subnets, so each outbound relay keeps its own budget of auth and pair requests; see Behind a load balancer.
Choose Save and start workers. No relay task is connected yet, so the page
says the configuration is saved and waiting for workers. Saving first means
each inbound relay task is ready on its first poll. A relay task that starts
before any host is saved answers 503 on /readyz, and the load balancer
health check fails it.
Keep the 8081 rule while you use the panel. Remove it when you finish, and add
it back with the authorize-security-group-ingress command of this step when
you return, for example for
More than one inbound relay task:
- bash
- PowerShell
aws ec2 revoke-security-group-ingress --group-id $SG_CP --protocol tcp \
  --port 8081 --cidr "$(curl -s https://checkip.amazonaws.com)/32"
$MY_IP = (Invoke-RestMethod https://checkip.amazonaws.com).Trim()
aws ec2 revoke-security-group-ingress --group-id $SG_CP --protocol tcp `
  --port 8081 --cidr "$MY_IP/32"
9. Start the inbound relay service
- bash
- PowerShell
aws ecs create-service --cluster mte-api-relay --service-name inbound \
  --task-definition mte-api-relay-inbound --desired-count 1 --launch-type FARGATE \
  --health-check-grace-period-seconds 60 \
  --deployment-configuration "deploymentCircuitBreaker={enable=true,rollback=true},minimumHealthyPercent=100,maximumPercent=200" \
  --load-balancers "targetGroupArn=$TG,containerName=relay,containerPort=8080" \
  --network-configuration "awsvpcConfiguration={subnets=[$SUBNETS],securityGroups=[$SG_RELAY],assignPublicIp=ENABLED}" \
  --service-connect-configuration '{"enabled": true, "namespace": "mte-api-relay"}'
@'
{"enabled": true, "namespace": "mte-api-relay"}
'@ | Set-Content inbound-service-connect.json
aws ecs create-service --cluster mte-api-relay --service-name inbound `
  --task-definition mte-api-relay-inbound --desired-count 1 --launch-type FARGATE `
  --health-check-grace-period-seconds 60 `
  --deployment-configuration "deploymentCircuitBreaker={enable=true,rollback=true},minimumHealthyPercent=100,maximumPercent=200" `
  --load-balancers "targetGroupArn=$TG,containerName=relay,containerPort=8080" `
  --network-configuration "awsvpcConfiguration={subnets=[$SUBNETS],securityGroups=[$SG_RELAY],assignPublicIp=ENABLED}" `
  --service-connect-configuration file://inbound-service-connect.json
The inbound relay service is a Service Connect client only: it calls
control-plane:8081 and publishes nothing. The deployment circuit breaker
stops a deployment whose tasks keep failing the health check, such as a wrong
image tag, and rolls the service back to the last task definition that worked;
without it, ECS replaces failing tasks forever. Start with one task, and read
More than one inbound relay task before
you scale out.
10. Start the outbound relay
The outbound relay runs next to your calling service, in that service's
account and VPC, and needs its own subscription there. It is standalone: its
one route is in DOMAIN_MAP, it keeps its pairs in memory, and it needs no
Redis and no control plane. In a shell for that account, set AWS_REGION,
ACCOUNT, SUBNETS, and IMAGE as at the top of this walkthrough, and create
the roles from step 1 and the log group. Then register its task definition.
The key, partner-api here, is the host your service uses to call it, and
upstream is the inbound relay's https:// address:
- bash
- PowerShell
aws logs create-log-group --log-group-name /ecs/mte-api-relay
cat > outbound.json <<EOF
{
  "family": "mte-api-relay-outbound",
  "networkMode": "awsvpc",
  "requiresCompatibilities": ["FARGATE"],
  "runtimePlatform": {"cpuArchitecture": "X86_64", "operatingSystemFamily": "LINUX"},
  "cpu": "512",
  "memory": "1024",
  "executionRoleArn": "arn:aws:iam::$ACCOUNT:role/mte-api-relay-execution",
  "taskRoleArn": "arn:aws:iam::$ACCOUNT:role/mte-api-relay-task",
  "containerDefinitions": [{
    "name": "relay",
    "image": "$IMAGE",
    "essential": true,
    "readonlyRootFilesystem": true,
    "stopTimeout": 45,
    "portMappings": [
      {"name": "relay", "containerPort": 8080, "protocol": "tcp", "appProtocol": "http"},
      {"name": "probe", "containerPort": 9091, "protocol": "tcp"}
    ],
    "environment": [
      {"name": "DOMAIN_MAP", "value": "{\"partner-api\": {\"upstream\": \"https://inbound-relay.example.com\", \"outbound\": true}}"}
    ],
    "logConfiguration": {"logDriver": "awslogs", "options": {"awslogs-group": "/ecs/mte-api-relay", "awslogs-region": "$AWS_REGION", "awslogs-stream-prefix": "outbound"}}
  }]
}
EOF
aws ecs register-task-definition --cli-input-json file://outbound.json
aws logs create-log-group --log-group-name /ecs/mte-api-relay
@"
{
  "family": "mte-api-relay-outbound",
  "networkMode": "awsvpc",
  "requiresCompatibilities": ["FARGATE"],
  "runtimePlatform": {"cpuArchitecture": "X86_64", "operatingSystemFamily": "LINUX"},
  "cpu": "512",
  "memory": "1024",
  "executionRoleArn": "arn:aws:iam::${ACCOUNT}:role/mte-api-relay-execution",
  "taskRoleArn": "arn:aws:iam::${ACCOUNT}:role/mte-api-relay-task",
  "containerDefinitions": [{
    "name": "relay",
    "image": "${IMAGE}",
    "essential": true,
    "readonlyRootFilesystem": true,
    "stopTimeout": 45,
    "portMappings": [
      {"name": "relay", "containerPort": 8080, "protocol": "tcp", "appProtocol": "http"},
      {"name": "probe", "containerPort": 9091, "protocol": "tcp"}
    ],
    "environment": [
      {"name": "DOMAIN_MAP", "value": "{\"partner-api\": {\"upstream\": \"https://inbound-relay.example.com\", \"outbound\": true}}"}
    ],
    "logConfiguration": {"logDriver": "awslogs", "options": {"awslogs-group": "/ecs/mte-api-relay", "awslogs-region": "${env:AWS_REGION}", "awslogs-stream-prefix": "outbound"}}
  }]
}
"@ | Set-Content outbound.json
aws ecs register-task-definition --cli-input-json file://outbound.json
Run it as a service that publishes the name partner-api on port 80 through
Service Connect, in the namespace your calling service uses, and allow port
8080 from your calling service's security group only. The timeout turns off
the Service Connect proxy's 15 second limit per request, which would cut off
slow API calls and streamed responses:
- bash
- PowerShell
CALLER_CLUSTER=my-app            # Update this value! Your calling service's cluster
CALLER_NAMESPACE=my-app          # Update this value! Its Service Connect namespace
CALLER_SG=sg-0123456789abcdef0   # Update this value! Allows 8080 from your service only

aws ecs create-service --cluster $CALLER_CLUSTER --service-name outbound \
  --task-definition mte-api-relay-outbound --desired-count 1 --launch-type FARGATE \
  --network-configuration "awsvpcConfiguration={subnets=[$SUBNETS],securityGroups=[$CALLER_SG],assignPublicIp=ENABLED}" \
  --service-connect-configuration '{"enabled": true, "namespace": "'$CALLER_NAMESPACE'", "services": [{"portName": "relay", "discoveryName": "partner-api", "clientAliases": [{"port": 80, "dnsName": "partner-api"}], "timeout": {"perRequestTimeoutSeconds": 0}}]}'
$CALLER_CLUSTER = 'my-app'            # Update this value! Your calling service's cluster
$CALLER_NAMESPACE = 'my-app'          # Update this value! Its Service Connect namespace
$CALLER_SG = 'sg-0123456789abcdef0'   # Update this value! Allows 8080 from your service only

@"
{"enabled": true, "namespace": "${CALLER_NAMESPACE}", "services": [{"portName": "relay", "discoveryName": "partner-api", "clientAliases": [{"port": 80, "dnsName": "partner-api"}], "timeout": {"perRequestTimeoutSeconds": 0}}]}
"@ | Set-Content outbound-service-connect.json
aws ecs create-service --cluster $CALLER_CLUSTER --service-name outbound `
  --task-definition mte-api-relay-outbound --desired-count 1 --launch-type FARGATE `
  --network-configuration "awsvpcConfiguration={subnets=[$SUBNETS],securityGroups=[$CALLER_SG],assignPublicIp=ENABLED}" `
  --service-connect-configuration file://outbound-service-connect.json
Your service then calls http://partner-api/... in place of the API, with the
same paths and no special headers; see Usage Guide. Your
service must be a Service Connect client in the same namespace, and only tasks
started after the outbound service exists can resolve the name, so run
aws ecs update-service --force-new-deployment on your service once. Never
expose the outbound relay outside your VPC: anything that reaches it can call
the API through the chain.
To manage the outbound relay from a panel instead, run a second control plane on the calling side, never the inbound side's, and use the Outbound relay switch under Proxies. See One control plane per side.
11. Check it
- bash
- PowerShell
aws ecs wait services-stable --cluster mte-api-relay --services inbound
aws ecs describe-services --cluster mte-api-relay --services control-plane inbound \
  --query 'services[].[serviceName,runningCount]' --output text
aws elbv2 describe-target-health --target-group-arn $TG \
  --query 'TargetHealthDescriptions[].TargetHealth.State' --output text
curl https://inbound-relay.example.com/api/mte-echo
aws logs tail /ecs/mte-api-relay --since 15m
aws ecs wait services-stable --cluster mte-api-relay --services inbound
aws ecs describe-services --cluster mte-api-relay --services control-plane inbound `
  --query 'services[].[serviceName,runningCount]' --output text
aws elbv2 describe-target-health --target-group-arn $TG `
  --query 'TargetHealthDescriptions[].TargetHealth.State' --output text
curl.exe https://inbound-relay.example.com/api/mte-echo
aws logs tail /ecs/mte-api-relay --since 15m
The wait returns once the relay task passes the health check, about a minute
after the service starts. Both services report one running task, the target is
healthy, and the echo answers {"message":"true",...}. The log shows
Billing manager initialized for startup RegisterUsage once per container,
MTE Relay control plane started, and Control-plane poll agent started. A
request from your service to http://partner-api/... returns the API's
answer.
The panel's Fleet page lists each inbound relay task by its hostname, with
runtime ecs, and offers the ECS restart command. With Service Connect, every
task's address reads 127.0.0.1, because the Service Connect proxy forwards
the poll; tell tasks apart by hostname.
More than one inbound relay task
Two or more inbound relay tasks share pair state in Redis, so a request can land on any task, whichever one created its pair. Create Amazon ElastiCache for Redis OSS with cluster mode disabled, TLS in transit, and an AUTH token, in the same VPC:
- bash
- PowerShell
SG_REDIS=$(sg mte-api-relay-redis)
aws ec2 authorize-security-group-ingress --group-id $SG_REDIS --protocol tcp --port 6379 --source-group $SG_RELAY
aws elasticache create-cache-subnet-group --cache-subnet-group-name mte-api-relay \
  --cache-subnet-group-description "MTE API Relay" --subnet-ids ${SUBNETS//,/ }
REDIS_TOKEN=$(openssl rand -hex 32)
aws elasticache create-replication-group --replication-group-id mte-api-relay \
  --replication-group-description "MTE API Relay pair state" \
  --engine redis --cache-node-type cache.t4g.small \
  --num-cache-clusters 2 --automatic-failover-enabled --multi-az-enabled \
  --cache-subnet-group-name mte-api-relay --security-group-ids $SG_REDIS \
  --transit-encryption-enabled --at-rest-encryption-enabled --auth-token "$REDIS_TOKEN"
aws elasticache wait replication-group-available --replication-group-id mte-api-relay
aws elasticache describe-replication-groups --replication-group-id mte-api-relay \
  --query 'ReplicationGroups[0].NodeGroups[0].PrimaryEndpoint.Address' --output text
$SG_REDIS = New-Sg mte-api-relay-redis
aws ec2 authorize-security-group-ingress --group-id $SG_REDIS --protocol tcp --port 6379 --source-group $SG_RELAY
aws elasticache create-cache-subnet-group --cache-subnet-group-name mte-api-relay `
  --cache-subnet-group-description "MTE API Relay" --subnet-ids ($SUBNETS -split ',')
$b = New-Object byte[] 32; [Security.Cryptography.RandomNumberGenerator]::Create().GetBytes($b)
$REDIS_TOKEN = -join ($b | ForEach-Object { $_.ToString('x2') })
aws elasticache create-replication-group --replication-group-id mte-api-relay `
  --replication-group-description "MTE API Relay pair state" `
  --engine redis --cache-node-type cache.t4g.small `
  --num-cache-clusters 2 --automatic-failover-enabled --multi-az-enabled `
  --cache-subnet-group-name mte-api-relay --security-group-ids $SG_REDIS `
  --transit-encryption-enabled --at-rest-encryption-enabled --auth-token $REDIS_TOKEN
aws elasticache wait replication-group-available --replication-group-id mte-api-relay
aws elasticache describe-replication-groups --replication-group-id mte-api-relay `
  --query 'ReplicationGroups[0].NodeGroups[0].PrimaryEndpoint.Address' --output text
Open the panel as in step 8, and under Configuration, set REDIS_URL to
rediss://:<REDIS_TOKEN>@<primary endpoint>:6379. The double s turns on
TLS, and the token follows the colon. Set TRUSTED_PROXIES too if you skipped
it in the wizard. Both are restart fields, so restart the inbound service, then
scale it:
- bash
- PowerShell
aws ecs update-service --cluster mte-api-relay --service inbound --force-new-deployment
aws ecs wait services-stable --cluster mte-api-relay --services inbound
aws ecs update-service --cluster mte-api-relay --service inbound --desired-count 3
aws ecs update-service --cluster mte-api-relay --service inbound --force-new-deployment
aws ecs wait services-stable --cluster mte-api-relay --services inbound
aws ecs update-service --cluster mte-api-relay --service inbound --desired-count 3
Each inbound relay task logs Connected to Redis for state storage when it
starts. The panel keeps REDIS_URL on EFS and shows the value workers run as
a fingerprint.
The setup wizard already generated one client_id_secret per host, shared by
every inbound relay task. The outbound relay keeps its pairs in memory and
needs no Redis.
Updates and restarts
- Restart fields:
aws ecs update-service --cluster mte-api-relay --service inbound --force-new-deployment. ECS starts the new tasks, waits until the load balancer marks them healthy, then drains the old ones. Wait foraws ecs wait services-stable --cluster mte-api-relay --services inboundbefore you change the desired count, so the two changes do not overlap. - Start order: start the control plane first. An inbound relay task that starts while the control plane is down waits for it and fails the load balancer health check, and ECS replaces it until the control plane answers.
- A new release: change the image tag in every task definition of the
chain, register them again, and update each service with
--task-definitionand the new revision. Update the control plane first; relay tasks keep serving while it restarts. If the new inbound tasks never pass the health check, the circuit breaker from step 9 rolls the inbound service back to the previous revision.
Where the control plane keeps its settings

The control plane keeps everything it stores as files under
CONTROL_PLANE_DATA_DIR, /data in this walkthrough. The image has no
writable data directory of its own, and a Fargate task's own storage disappears
with the task, so the task definition maps /data to Amazon EFS:
mountPointsplaces the volumecontrol-plane-dataat/datain the container.- The volume's
efsVolumeConfigurationnames the file system and the access point, with TLS in transit. - The access point roots the volume at
/control-planeon the file system and runs every file operation as user and group 65532, the image's user, so the control plane writes without root. - EFS keeps the files in the Region, across Availability Zones, encrypted at rest. The mount target in each subnet serves NFS on port 2049, open only to the control plane's security group.
The directory holds overrides.json, the configuration and its version;
history/, the last 50 versions; agent_tokens.json, the service tokens;
and admin_jwt_secret, the session signing key. A replacement task mounts the
same directory and starts with the same configuration and version. Only the
control plane mounts it; relay tasks receive the configuration by polling.
The backup policy from step 3 takes a daily AWS Backup snapshot of the file
system. GET /api/config exports the same document through the panel API;
see Backup and restore.
Production architecture
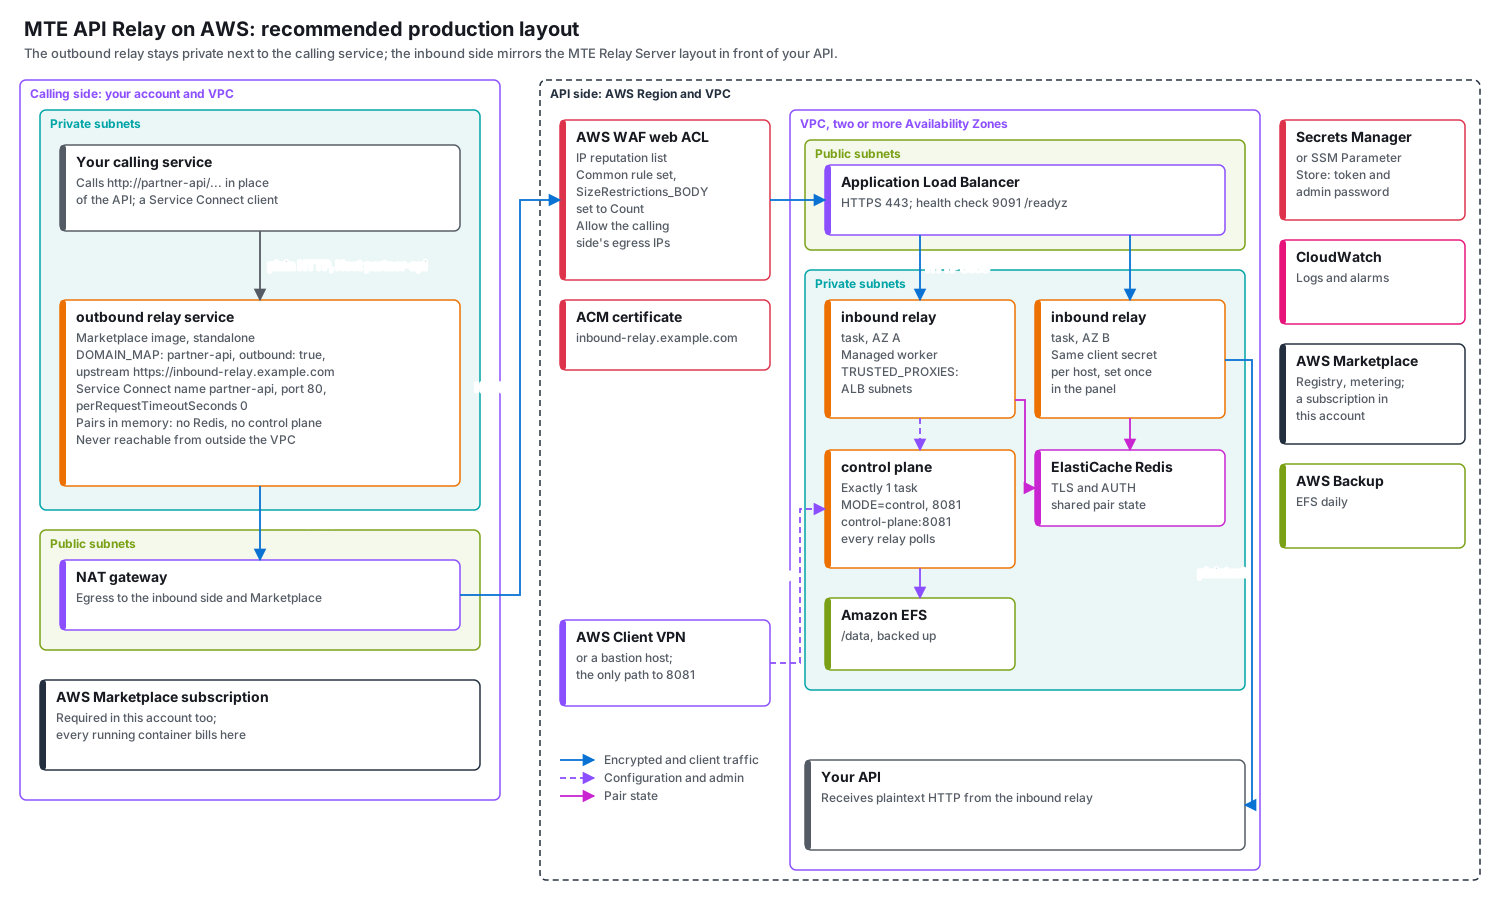
The walkthrough is the smallest complete chain. For production, keep its shape and add these:
- Keep the outbound relay private. It runs in private subnets next to your calling service, reachable only through Service Connect, and leaves through a NAT gateway. Anything that reaches it can call your API through the chain.
- Private subnets in two or more Availability Zones on the inbound side for
the inbound relay tasks and the control plane, with
assignPublicIp=DISABLEDand a NAT gateway in each Availability Zone. The tasks still need outbound access to the Marketplace registry inus-east-1and to AWS Marketplace metering. Only the load balancer sits in public subnets. - AWS WAF on the inbound load balancer. Associate a web ACL with the IP
reputation list, the core rule set, known bad inputs, and a rate based rule
per IP, and allow the calling side's NAT addresses. In the core rule set,
AWSManagedRulesCommonRuleSet, setSizeRestrictions_BODYto Count. That rule blocks every request body over 8 KB. That includes the pairing requests that fill the outbound relay's pool, about 14 KB with Kyber 1024, and any encrypted request over 8 KB. The relay's own caps,MAX_REQUEST_BODY_MIBandMAX_CONTROL_BODY_MIB, still limit bodies. The rule entry in the web ACL looks like this:
{
  "Name": "AWSManagedRulesCommonRuleSet",
  "Priority": 1,
  "Statement": {
    "ManagedRuleGroupStatement": {
      "VendorName": "AWS",
      "Name": "AWSManagedRulesCommonRuleSet",
      "RuleActionOverrides": [
        { "Name": "SizeRestrictions_BODY", "ActionToUse": { "Count": {} } }
      ]
    }
  },
  "OverrideAction": { "None": {} },
  "VisibilityConfig": {
    "SampledRequestsEnabled": true,
    "CloudWatchMetricsEnabled": true,
    "MetricName": "AWSManagedRulesCommonRuleSet"
  }
}
- Two or more inbound relay tasks with Redis, as in
More than one inbound relay task, and ECS
Service Auto Scaling with a target tracking policy on CPU and a minimum of 2
tasks. Load balancer stickiness is not needed. The commands below register
the inbound service with a floor of 2 and a ceiling of 6 tasks and hold
average CPU near 60 percent. Afterwards change the floor with
register-scalable-target, not withupdate-service --desired-count, which the policy undoes.
- bash
- PowerShell
aws application-autoscaling register-scalable-target --service-namespace ecs \
  --resource-id service/mte-api-relay/inbound --scalable-dimension ecs:service:DesiredCount \
  --min-capacity 2 --max-capacity 6
aws application-autoscaling put-scaling-policy --service-namespace ecs \
  --resource-id service/mte-api-relay/inbound --scalable-dimension ecs:service:DesiredCount \
  --policy-name mte-api-relay-cpu --policy-type TargetTrackingScaling \
  --target-tracking-scaling-policy-configuration '{"TargetValue": 60.0, "PredefinedMetricSpecification": {"PredefinedMetricType": "ECSServiceAverageCPUUtilization"}, "ScaleOutCooldown": 60, "ScaleInCooldown": 300}'
@'
{"TargetValue": 60.0, "PredefinedMetricSpecification": {"PredefinedMetricType": "ECSServiceAverageCPUUtilization"}, "ScaleOutCooldown": 60, "ScaleInCooldown": 300}
'@ | Set-Content cpu-scaling.json
aws application-autoscaling register-scalable-target --service-namespace ecs `
  --resource-id service/mte-api-relay/inbound --scalable-dimension ecs:service:DesiredCount `
  --min-capacity 2 --max-capacity 6
aws application-autoscaling put-scaling-policy --service-namespace ecs `
  --resource-id service/mte-api-relay/inbound --scalable-dimension ecs:service:DesiredCount `
  --policy-name mte-api-relay-cpu --policy-type TargetTrackingScaling `
  --target-tracking-scaling-policy-configuration file://cpu-scaling.json
TRUSTED_PROXIESset to the CIDRs of the inbound load balancer's subnets, so each outbound relay keeps its own auth and pair budget. See Behind a load balancer.- One control plane task on the inbound side, reachable only over a VPN, AWS Client VPN, or a bastion host. Never add port 8081 to a load balancer. Keep the daily EFS backup on.
- IAM authorization on the file system. The security group from step 3
already limits NFS to the control plane's tasks. To also require the task
role, attach a file system policy that allows only
mte-api-relay-taskthrough the access point, and set"iam": "ENABLED"in the task definition'sauthorizationConfig. A task without the role is then refused at mount withaccess denied by server.
- bash
- PowerShell
cat > efs-policy.json <<EOF
{
  "Version": "2012-10-17",
  "Statement": [{
    "Effect": "Allow",
    "Principal": {"AWS": "arn:aws:iam::$ACCOUNT:role/mte-api-relay-task"},
    "Action": ["elasticfilesystem:ClientMount", "elasticfilesystem:ClientWrite"],
    "Resource": "arn:aws:elasticfilesystem:$AWS_REGION:$ACCOUNT:file-system/$EFS",
    "Condition": {
      "Bool": {"elasticfilesystem:AccessedViaMountTarget": "true"},
      "StringEquals": {"elasticfilesystem:AccessPointArn": "arn:aws:elasticfilesystem:$AWS_REGION:$ACCOUNT:access-point/$EFS_AP"}
    }
  }]
}
EOF
aws efs put-file-system-policy --file-system-id $EFS --policy file://efs-policy.json
@"
{
  "Version": "2012-10-17",
  "Statement": [{
    "Effect": "Allow",
    "Principal": {"AWS": "arn:aws:iam::${ACCOUNT}:role/mte-api-relay-task"},
    "Action": ["elasticfilesystem:ClientMount", "elasticfilesystem:ClientWrite"],
    "Resource": "arn:aws:elasticfilesystem:${env:AWS_REGION}:${ACCOUNT}:file-system/${EFS}",
    "Condition": {
      "Bool": {"elasticfilesystem:AccessedViaMountTarget": "true"},
      "StringEquals": {"elasticfilesystem:AccessPointArn": "arn:aws:elasticfilesystem:${env:AWS_REGION}:${ACCOUNT}:access-point/${EFS_AP}"}
    }
  }]
}
"@ | Set-Content efs-policy.json
aws efs put-file-system-policy --file-system-id $EFS --policy file://efs-policy.json
- Secrets in SSM Parameter Store as
SecureStringvalues, or in AWS Secrets Manager. The task definition'ssecretstakes either ARN invalueFrom; for Secrets Manager the execution role needssecretsmanager:GetSecretValueon the secret instead ofssm:GetParameters. On EKS, the Secrets Store CSI Driver with the AWS provider, or External Secrets Operator, writes a Secrets Manager secret into themte-relay-control-planeSecret the manifests read. The client secrets andREDIS_URLlive in the control plane, on encrypted EFS or EBS. - Monitoring: CloudWatch alarms on the inbound target group's healthy host
count and on 5xx responses, with the JSON logs in CloudWatch Logs on both
sides. Container Insights,
aws ecs update-cluster-settings --cluster mte-api-relay --settings name=containerInsights,value=enhanced, adds per task CPU and memory metrics at CloudWatch's metric price. On EKS, the CloudWatch Observability add on from step 1 ships the logs and Container Insights metrics, and the same alarms apply to the Ingress's target group.
Every running container bills at the listing's price, in the account that runs it: the outbound relay on the calling side, and the inbound relay tasks and the control plane on the API side.
Deploy on Amazon EKS
AWS Quick Deploy turns steps 1 to 9 of this walkthrough into one script, with your inbound host already configured. The steps below build it by hand.
This walkthrough creates an EKS cluster with eksctl and runs the inbound side
of a chain in it: a control plane and an inbound relay Deployment behind an
Application Load Balancer, in front of your API. Nodes sit in private subnets,
an IAM role for service accounts (IRSA) lets the pods call RegisterUsage, the
Amazon EBS CSI driver holds the control plane's settings, and the AWS Load
Balancer Controller creates the load balancer. Step 10 adds the outbound relay
that your calling service uses.
You need the AWS CLI v2, eksctl, kubectl, and helm, in bash on Linux,
macOS, or WSL, with openssl, or in PowerShell 7 or Windows PowerShell 5.1.
The tabs work as in the ECS walkthrough. Set these first:
- bash
- PowerShell
export AWS_REGION=us-east-2                          # Update this value!
export CLUSTER=mte-api-relay
ACCOUNT=$(aws sts get-caller-identity --query Account --output text)
IMAGE=709825985650.dkr.ecr.us-east-1.amazonaws.com/eclypses/mar-hoc:5.0.5
CERT_ARN=arn:aws:acm:us-east-2:111122223333:certificate/00000000-0000-0000-0000-000000000000  # Update this value!
LBC_VERSION=v3.6.0
$env:AWS_REGION = 'us-east-2'                        # Update this value!
$CLUSTER = 'mte-api-relay'
$ACCOUNT = aws sts get-caller-identity --query Account --output text
$IMAGE = '709825985650.dkr.ecr.us-east-1.amazonaws.com/eclypses/mar-hoc:5.0.5'
$CERT_ARN = 'arn:aws:acm:us-east-2:111122223333:certificate/00000000-0000-0000-0000-000000000000'  # Update this value!
$LBC_VERSION = 'v3.6.0'
CERT_ARN is an ACM certificate, in the same Region, for the hostname clients
will use, inbound-relay.example.com in this walkthrough. LBC_VERSION pins the AWS
Load Balancer Controller release.
1. Create the cluster
- bash
- PowerShell
cat > cluster.yaml <<EOF
apiVersion: eksctl.io/v1alpha5
kind: ClusterConfig
metadata:
  name: $CLUSTER
  region: $AWS_REGION
iam:
  withOIDC: true
addons:
  - name: aws-ebs-csi-driver
    wellKnownPolicies:
      ebsCSIController: true
  - name: metrics-server
  - name: amazon-cloudwatch-observability
    configurationValues: '{"manager": {"applicationSignals": {"autoMonitor": {"monitorAllServices": false}}}}'
managedNodeGroups:
  - name: workers
    instanceType: m6i.large
    minSize: 2
    maxSize: 4
    desiredCapacity: 2
    privateNetworking: true
    iam:
      withAddonPolicies:
        cloudWatch: true
EOF
eksctl create cluster -f cluster.yaml
aws eks update-kubeconfig --name $CLUSTER --region $AWS_REGION
kubectl get nodes
@"
apiVersion: eksctl.io/v1alpha5
kind: ClusterConfig
metadata:
  name: ${CLUSTER}
  region: ${env:AWS_REGION}
iam:
  withOIDC: true
addons:
  - name: aws-ebs-csi-driver
    wellKnownPolicies:
      ebsCSIController: true
  - name: metrics-server
  - name: amazon-cloudwatch-observability
    configurationValues: '{"manager": {"applicationSignals": {"autoMonitor": {"monitorAllServices": false}}}}'
managedNodeGroups:
  - name: workers
    instanceType: m6i.large
    minSize: 2
    maxSize: 4
    desiredCapacity: 2
    privateNetworking: true
    iam:
      withAddonPolicies:
        cloudWatch: true
"@ | Set-Content cluster.yaml
eksctl create cluster -f cluster.yaml
aws eks update-kubeconfig --name $CLUSTER --region $env:AWS_REGION
kubectl get nodes
eksctl takes about 20 minutes. It creates a VPC with public and private
subnets and a NAT gateway, a managed node group in the private subnets, the
OIDC provider that IRSA needs, and three add ons: the EBS CSI driver for the
control plane volume, metrics-server for the autoscaler in step 8, and the
CloudWatch Observability add on, which ships every container log to CloudWatch
Logs and turns on Container Insights under the node role. Its
configurationValues turn off Application Signals auto monitor. Left on, the
add on annotates every Deployment it sees restart and injects four language
agent init containers into each pod; the relay is a Go binary, so they would
only add start up time, image pulls, and 350 MiB of memory requests per pod.
aws eks update-kubeconfig points kubectl at the new cluster through the AWS
CLI, whatever authenticator eksctl found on your machine. The node role
already allows image pulls from the Marketplace registry, so no image pull
secret is needed.
To use an existing cluster instead, it needs an IAM OIDC provider
(eksctl utils associate-iam-oidc-provider --cluster $CLUSTER --approve), the
aws-ebs-csi-driver and metrics-server add ons, and nodes whose subnets
reach the internet.
2. Create the namespace and the service accounts
- bash
- PowerShell
kubectl create namespace mte-relay
kubectl label namespace mte-relay elbv2.k8s.aws/pod-readiness-gate-inject=enabled

eksctl create iamserviceaccount --cluster $CLUSTER --namespace mte-relay \
  --name mte-relay --role-name mte-api-relay-eks-metering \
  --attach-policy-arn arn:aws:iam::aws:policy/AWSMarketplaceMeteringRegisterUsage \
  --approve

curl -fsSLo lbc-iam-policy.json \
  https://raw.githubusercontent.com/kubernetes-sigs/aws-load-balancer-controller/$LBC_VERSION/docs/install/iam_policy.json
aws iam create-policy --policy-name AWSLoadBalancerControllerIAMPolicy \
  --policy-document file://lbc-iam-policy.json
eksctl create iamserviceaccount --cluster $CLUSTER --namespace kube-system \
  --name aws-load-balancer-controller --role-name mte-api-relay-eks-lbc \
  --attach-policy-arn arn:aws:iam::$ACCOUNT:policy/AWSLoadBalancerControllerIAMPolicy \
  --approve
kubectl create namespace mte-relay
kubectl label namespace mte-relay elbv2.k8s.aws/pod-readiness-gate-inject=enabled

eksctl create iamserviceaccount --cluster $CLUSTER --namespace mte-relay `
  --name mte-relay --role-name mte-api-relay-eks-metering `
  --attach-policy-arn arn:aws:iam::aws:policy/AWSMarketplaceMeteringRegisterUsage `
  --approve

Invoke-WebRequest -UseBasicParsing -OutFile lbc-iam-policy.json `
  "https://raw.githubusercontent.com/kubernetes-sigs/aws-load-balancer-controller/$LBC_VERSION/docs/install/iam_policy.json"
aws iam create-policy --policy-name AWSLoadBalancerControllerIAMPolicy `
  --policy-document file://lbc-iam-policy.json
eksctl create iamserviceaccount --cluster $CLUSTER --namespace kube-system `
  --name aws-load-balancer-controller --role-name mte-api-relay-eks-lbc `
  --attach-policy-arn "arn:aws:iam::${ACCOUNT}:policy/AWSLoadBalancerControllerIAMPolicy" `
  --approve
- The
mte-relayservice account carries theRegisterUsagepermission. Every relay and control plane pod runs under it. AWS Marketplace metering accepts only IRSA on EKS, not EKS Pod Identity, the node role, or access keys. - The namespace label makes the load balancer controller hold each new relay pod out of service until the load balancer's health check passes, so a rolling restart never drops below the healthy count.
- If the controller already runs in your cluster, skip the last two commands and step 3.
3. Install the AWS Load Balancer Controller
- bash
- PowerShell
helm repo add eks https://aws.github.io/eks-charts
helm repo update eks
helm install aws-load-balancer-controller eks/aws-load-balancer-controller \
  --namespace kube-system --version ${LBC_VERSION#v} \
  --set clusterName=$CLUSTER --set region=$AWS_REGION \
  --set vpcId=$(aws eks describe-cluster --name $CLUSTER --query cluster.resourcesVpcConfig.vpcId --output text) \
  --set serviceAccount.create=false --set serviceAccount.name=aws-load-balancer-controller
kubectl -n kube-system rollout status deployment/aws-load-balancer-controller
helm repo add eks https://aws.github.io/eks-charts
helm repo update eks
helm install aws-load-balancer-controller eks/aws-load-balancer-controller `
  --namespace kube-system --version $LBC_VERSION.TrimStart('v') `
  --set "clusterName=$CLUSTER" --set "region=$env:AWS_REGION" `
  --set "vpcId=$(aws eks describe-cluster --name $CLUSTER --query cluster.resourcesVpcConfig.vpcId --output text)" `
  --set serviceAccount.create=false --set serviceAccount.name=aws-load-balancer-controller
kubectl -n kube-system rollout status deployment/aws-load-balancer-controller
4. Create the secret
- bash
- PowerShell
kubectl -n mte-relay create secret generic mte-relay-control-plane \
  --from-literal=CONTROL_PLANE_TOKEN="$(openssl rand -hex 32)" \
  --from-literal=ADMIN_PW="$(openssl rand -hex 24)"
$b = New-Object byte[] 32; [Security.Cryptography.RandomNumberGenerator]::Create().GetBytes($b)
$TOKEN = -join ($b | ForEach-Object { $_.ToString('x2') })
$b = New-Object byte[] 24; [Security.Cryptography.RandomNumberGenerator]::Create().GetBytes($b)
$ADMIN_PW = -join ($b | ForEach-Object { $_.ToString('x2') })
kubectl -n mte-relay create secret generic mte-relay-control-plane `
  "--from-literal=CONTROL_PLANE_TOKEN=$TOKEN" `
  "--from-literal=ADMIN_PW=$ADMIN_PW"
The control plane reads both values; each relay pod reads
CONTROL_PLANE_TOKEN. For production, see
Production architecture for keeping them in AWS
Secrets Manager.
5. Create the manifest
- bash
- PowerShell
cat > mte-api-relay.yaml <<EOF
apiVersion: storage.k8s.io/v1
kind: StorageClass
metadata:
  name: gp3
provisioner: ebs.csi.aws.com
volumeBindingMode: WaitForFirstConsumer
parameters:
  type: gp3
  encrypted: "true"
---
apiVersion: v1
kind: PersistentVolumeClaim
metadata:
  name: mte-relay-control-plane-data
spec:
  storageClassName: gp3
  accessModes: ["ReadWriteOnce"]
  resources:
    requests:
      storage: 1Gi
---
apiVersion: apps/v1
kind: Deployment
metadata:
  name: mte-relay-control-plane
spec:
  replicas: 1 # the stored configuration has one writer
  strategy:
    type: Recreate # a rolling update would briefly run two control planes on one volume
  selector:
    matchLabels:
      app: mte-relay-control-plane
  template:
    metadata:
      labels:
        app: mte-relay-control-plane
    spec:
      serviceAccountName: mte-relay # IRSA: RegisterUsage
      securityContext:
        runAsNonRoot: true
        runAsUser: 65532 # the image's user
        runAsGroup: 65532
        fsGroup: 65532 # a new EBS volume is owned by root; this makes it writable
        seccompProfile:
          type: RuntimeDefault
      containers:
        - name: control-plane
          image: $IMAGE
          securityContext:
            allowPrivilegeEscalation: false
            readOnlyRootFilesystem: true
            capabilities:
              drop: ["ALL"]
          resources:
            requests:
              cpu: 250m
              memory: 256Mi
            limits:
              memory: 512Mi
          env:
            - name: MODE
              value: control
            - name: LISTEN_PORT
              value: "8081"
            - name: CONTROL_PLANE_DATA_DIR
              value: /data
          envFrom:
            - secretRef:
                name: mte-relay-control-plane
          ports:
            - containerPort: 8081
          volumeMounts:
            - name: data
              mountPath: /data
          readinessProbe:
            httpGet: { path: /healthz, port: 8081 }
            periodSeconds: 5
          livenessProbe:
            httpGet: { path: /healthz, port: 8081 }
            initialDelaySeconds: 10
            periodSeconds: 10
      volumes:
        - name: data
          persistentVolumeClaim:
            claimName: mte-relay-control-plane-data
---
apiVersion: v1
kind: Service
metadata:
  name: mte-relay-control-plane
spec:
  selector:
    app: mte-relay-control-plane
  ports:
    - port: 8081
      targetPort: 8081
---
apiVersion: apps/v1
kind: Deployment
metadata:
  name: mte-api-relay-inbound
spec:
  replicas: 1
  selector:
    matchLabels:
      app: mte-api-relay-inbound
  template:
    metadata:
      labels:
        app: mte-api-relay-inbound
    spec:
      serviceAccountName: mte-relay # IRSA: RegisterUsage
      terminationGracePeriodSeconds: 45 # above DRAIN_SECONDS
      securityContext:
        runAsNonRoot: true
        runAsUser: 65532
        runAsGroup: 65532
        seccompProfile:
          type: RuntimeDefault
      topologySpreadConstraints:
        - maxSkew: 1
          topologyKey: topology.kubernetes.io/zone
          whenUnsatisfiable: ScheduleAnyway
          labelSelector:
            matchLabels:
              app: mte-api-relay-inbound
      containers:
        - name: relay
          image: $IMAGE
          securityContext:
            allowPrivilegeEscalation: false
            readOnlyRootFilesystem: true
            capabilities:
              drop: ["ALL"]
          resources:
            requests:
              cpu: 500m
              memory: 512Mi
            limits:
              memory: 1Gi
          env:
            - name: CONTROL_PLANE_URL
              value: http://mte-relay-control-plane:8081
            - name: CONTROL_PLANE_TOKEN
              valueFrom:
                secretKeyRef:
                  name: mte-relay-control-plane
                  key: CONTROL_PLANE_TOKEN
          ports:
            - containerPort: 8080
              name: relay
            - containerPort: 9091
              name: probe
          readinessProbe:
            httpGet: { path: /readyz, port: probe }
            periodSeconds: 5
          livenessProbe:
            httpGet: { path: /healthz, port: probe }
            initialDelaySeconds: 5
            periodSeconds: 10
---
apiVersion: v1
kind: Service
metadata:
  name: mte-api-relay-inbound
spec:
  selector:
    app: mte-api-relay-inbound
  ports:
    - port: 8080
      targetPort: relay
---
apiVersion: networking.k8s.io/v1
kind: Ingress
metadata:
  name: mte-api-relay-inbound
  annotations:
    alb.ingress.kubernetes.io/load-balancer-name: mte-api-relay-eks
    alb.ingress.kubernetes.io/scheme: internet-facing
    alb.ingress.kubernetes.io/target-type: ip
    alb.ingress.kubernetes.io/listen-ports: '[{"HTTPS": 443}]'
    alb.ingress.kubernetes.io/certificate-arn: $CERT_ARN
    alb.ingress.kubernetes.io/ssl-policy: ELBSecurityPolicy-TLS13-1-2-2021-06
    alb.ingress.kubernetes.io/load-balancer-attributes: routing.http.drop_invalid_header_fields.enabled=true
    alb.ingress.kubernetes.io/healthcheck-port: "9091"
    alb.ingress.kubernetes.io/healthcheck-path: /readyz
    alb.ingress.kubernetes.io/healthcheck-interval-seconds: "10"
    alb.ingress.kubernetes.io/healthy-threshold-count: "2"
    alb.ingress.kubernetes.io/target-group-attributes: deregistration_delay.timeout_seconds=60
spec:
  ingressClassName: alb
  rules:
    - http:
        paths:
          - path: /
            pathType: Prefix
            backend:
              service:
                name: mte-api-relay-inbound
                port:
                  number: 8080
EOF
@"
apiVersion: storage.k8s.io/v1
kind: StorageClass
metadata:
  name: gp3
provisioner: ebs.csi.aws.com
volumeBindingMode: WaitForFirstConsumer
parameters:
  type: gp3
  encrypted: "true"
---
apiVersion: v1
kind: PersistentVolumeClaim
metadata:
  name: mte-relay-control-plane-data
spec:
  storageClassName: gp3
  accessModes: ["ReadWriteOnce"]
  resources:
    requests:
      storage: 1Gi
---
apiVersion: apps/v1
kind: Deployment
metadata:
  name: mte-relay-control-plane
spec:
  replicas: 1 # the stored configuration has one writer
  strategy:
    type: Recreate # a rolling update would briefly run two control planes on one volume
  selector:
    matchLabels:
      app: mte-relay-control-plane
  template:
    metadata:
      labels:
        app: mte-relay-control-plane
    spec:
      serviceAccountName: mte-relay # IRSA: RegisterUsage
      securityContext:
        runAsNonRoot: true
        runAsUser: 65532 # the image's user
        runAsGroup: 65532
        fsGroup: 65532 # a new EBS volume is owned by root; this makes it writable
        seccompProfile:
          type: RuntimeDefault
      containers:
        - name: control-plane
          image: ${IMAGE}
          securityContext:
            allowPrivilegeEscalation: false
            readOnlyRootFilesystem: true
            capabilities:
              drop: ["ALL"]
          resources:
            requests:
              cpu: 250m
              memory: 256Mi
            limits:
              memory: 512Mi
          env:
            - name: MODE
              value: control
            - name: LISTEN_PORT
              value: "8081"
            - name: CONTROL_PLANE_DATA_DIR
              value: /data
          envFrom:
            - secretRef:
                name: mte-relay-control-plane
          ports:
            - containerPort: 8081
          volumeMounts:
            - name: data
              mountPath: /data
          readinessProbe:
            httpGet: { path: /healthz, port: 8081 }
            periodSeconds: 5
          livenessProbe:
            httpGet: { path: /healthz, port: 8081 }
            initialDelaySeconds: 10
            periodSeconds: 10
      volumes:
        - name: data
          persistentVolumeClaim:
            claimName: mte-relay-control-plane-data
---
apiVersion: v1
kind: Service
metadata:
  name: mte-relay-control-plane
spec:
  selector:
    app: mte-relay-control-plane
  ports:
    - port: 8081
      targetPort: 8081
---
apiVersion: apps/v1
kind: Deployment
metadata:
  name: mte-api-relay-inbound
spec:
  replicas: 1
  selector:
    matchLabels:
      app: mte-api-relay-inbound
  template:
    metadata:
      labels:
        app: mte-api-relay-inbound
    spec:
      serviceAccountName: mte-relay # IRSA: RegisterUsage
      terminationGracePeriodSeconds: 45 # above DRAIN_SECONDS
      securityContext:
        runAsNonRoot: true
        runAsUser: 65532
        runAsGroup: 65532
        seccompProfile:
          type: RuntimeDefault
      topologySpreadConstraints:
        - maxSkew: 1
          topologyKey: topology.kubernetes.io/zone
          whenUnsatisfiable: ScheduleAnyway
          labelSelector:
            matchLabels:
              app: mte-api-relay-inbound
      containers:
        - name: relay
          image: ${IMAGE}
          securityContext:
            allowPrivilegeEscalation: false
            readOnlyRootFilesystem: true
            capabilities:
              drop: ["ALL"]
          resources:
            requests:
              cpu: 500m
              memory: 512Mi
            limits:
              memory: 1Gi
          env:
            - name: CONTROL_PLANE_URL
              value: http://mte-relay-control-plane:8081
            - name: CONTROL_PLANE_TOKEN
              valueFrom:
                secretKeyRef:
                  name: mte-relay-control-plane
                  key: CONTROL_PLANE_TOKEN
          ports:
            - containerPort: 8080
              name: relay
            - containerPort: 9091
              name: probe
          readinessProbe:
            httpGet: { path: /readyz, port: probe }
            periodSeconds: 5
          livenessProbe:
            httpGet: { path: /healthz, port: probe }
            initialDelaySeconds: 5
            periodSeconds: 10
---
apiVersion: v1
kind: Service
metadata:
  name: mte-api-relay-inbound
spec:
  selector:
    app: mte-api-relay-inbound
  ports:
    - port: 8080
      targetPort: relay
---
apiVersion: networking.k8s.io/v1
kind: Ingress
metadata:
  name: mte-api-relay-inbound
  annotations:
    alb.ingress.kubernetes.io/load-balancer-name: mte-api-relay-eks
    alb.ingress.kubernetes.io/scheme: internet-facing
    alb.ingress.kubernetes.io/target-type: ip
    alb.ingress.kubernetes.io/listen-ports: '[{"HTTPS": 443}]'
    alb.ingress.kubernetes.io/certificate-arn: ${CERT_ARN}
    alb.ingress.kubernetes.io/ssl-policy: ELBSecurityPolicy-TLS13-1-2-2021-06
    alb.ingress.kubernetes.io/load-balancer-attributes: routing.http.drop_invalid_header_fields.enabled=true
    alb.ingress.kubernetes.io/healthcheck-port: "9091"
    alb.ingress.kubernetes.io/healthcheck-path: /readyz
    alb.ingress.kubernetes.io/healthcheck-interval-seconds: "10"
    alb.ingress.kubernetes.io/healthy-threshold-count: "2"
    alb.ingress.kubernetes.io/target-group-attributes: deregistration_delay.timeout_seconds=60
spec:
  ingressClassName: alb
  rules:
    - http:
        paths:
          - path: /
            pathType: Prefix
            backend:
              service:
                name: mte-api-relay-inbound
                port:
                  number: 8080
"@ | Set-Content mte-api-relay.yaml
- The heredoc, or the PowerShell here-string, fills in
$IMAGEand$CERT_ARN. - Both containers run as user 65532 with a read only root file system, no
privilege escalation, and no Linux capabilities. The relay writes nothing and
the control plane writes only to
/data. The resource requests size the pods like the ECS tasks and give the autoscaler in step 8 its CPU baseline. topologySpreadConstraintsspreads the relay pods across Availability Zones once there is more than one.- The control plane keeps its settings on an encrypted gp3 EBS volume through
the PersistentVolumeClaim;
fsGrouplets the image's user write to it. See Where the control plane keeps its settings for what the directory holds. - The inbound relay pods carry no
DOMAIN_MAP. They wait for the configuration you save in step 6, and readiness keeps them out of the load balancer until then without restarting them. - The Ingress has no host rule, so every hostname reaches the relay pods, and
the inbound relay routes by
Host. The load balancer checksGET /readyzon port 9091, with the same timing as the ECS walkthrough. The listener takes TLS 1.2 and 1.3 only, and the load balancer removes HTTP headers with invalid names instead of forwarding them.
6. Apply it and run the setup wizard
- bash
- PowerShell
kubectl -n mte-relay apply -f mte-api-relay.yaml
kubectl -n mte-relay rollout status deployment/mte-relay-control-plane
kubectl -n mte-relay get pods
kubectl -n mte-relay logs deployment/mte-relay-control-plane | grep RegisterUsage
kubectl -n mte-relay apply -f mte-api-relay.yaml
kubectl -n mte-relay rollout status deployment/mte-relay-control-plane
kubectl -n mte-relay get pods
kubectl -n mte-relay logs deployment/mte-relay-control-plane | Select-String RegisterUsage
The control plane pod is 1/1 Running, the inbound relay pod is 0/1 Running
and waits for its configuration, and the control plane log shows
Billing manager initialized for startup RegisterUsage. Reach the panel with a
port forward, which keeps running in a second terminal:
- bash
- PowerShell
kubectl -n mte-relay port-forward svc/mte-relay-control-plane 8081:8081
kubectl -n mte-relay port-forward svc/mte-relay-control-plane 8081:8081
Then find the admin password, the load balancer's DNS name, and the CIDRs of its public subnets:
- bash
- PowerShell
kubectl -n mte-relay get secret mte-relay-control-plane \
  -o jsonpath='{.data.ADMIN_PW}' | base64 -d; echo
kubectl -n mte-relay get ingress mte-api-relay-inbound \
  -o jsonpath='{.status.loadBalancer.ingress[0].hostname}'; echo
aws ec2 describe-subnets \
  --filters "Name=tag:alpha.eksctl.io/cluster-name,Values=$CLUSTER" "Name=tag:kubernetes.io/role/elb,Values=1" \
  --query 'Subnets[].CidrBlock' --output text | tr '\t' ','
$ADMIN_PW_B64 = kubectl -n mte-relay get secret mte-relay-control-plane -o 'jsonpath={.data.ADMIN_PW}'
[Text.Encoding]::UTF8.GetString([Convert]::FromBase64String($ADMIN_PW_B64))
kubectl -n mte-relay get ingress mte-api-relay-inbound -o 'jsonpath={.status.loadBalancer.ingress[0].hostname}'
(aws ec2 describe-subnets `
  --filters "Name=tag:alpha.eksctl.io/cluster-name,Values=$CLUSTER" "Name=tag:kubernetes.io/role/elb,Values=1" `
  --query 'Subnets[].CidrBlock' --output text) -replace "`t", ','
The load balancer's DNS name appears a minute or two after the apply. Open
http://localhost:8081, sign in as admin with the
password, choose Start setup, and run
the setup wizard:
- License: leave both fields empty. The subscription is the license.
- Hosts: enter
inbound-relay.example.com, the name the outbound relay calls, and your API's URL. Pointinbound-relay.example.comat the load balancer's DNS name. To test before DNS is in place, add the DNS name itself as a second host and call it withcurl -k, orcurl.exe -kin PowerShell. - Advanced: set
TRUSTED_PROXIESto the public subnet CIDRs from the last command.
Choose Save and start workers. The inbound side serves the outbound relay, not browsers, so it needs no CORS.
7. Check it
- bash
- PowerShell
kubectl -n mte-relay get pods
curl https://inbound-relay.example.com/api/mte-echo
curl "https://inbound-relay.example.com/api/mte-relay?frameVersions=2"
kubectl -n mte-relay logs deployment/mte-api-relay-inbound | grep -E "RegisterUsage|poll agent started|lifecycle phase"
aws logs tail /aws/containerinsights/$CLUSTER/application --since 15m --format short | grep -c RegisterUsage
aws logs put-retention-policy --log-group-name /aws/containerinsights/$CLUSTER/application --retention-in-days 30
kubectl -n mte-relay get pods
curl.exe https://inbound-relay.example.com/api/mte-echo
curl.exe "https://inbound-relay.example.com/api/mte-relay?frameVersions=2"
kubectl -n mte-relay logs deployment/mte-api-relay-inbound | Select-String -Pattern 'RegisterUsage|poll agent started|lifecycle phase'
(aws logs tail "/aws/containerinsights/$CLUSTER/application" --since 15m --format short | Select-String RegisterUsage).Count
aws logs put-retention-policy --log-group-name "/aws/containerinsights/$CLUSTER/application" --retention-in-days 30
Both pods are 1/1 Running, the echo answers {"message":"true",...}, and
discovery returns a client id with "buildVersion":"5.0.5". The
panel's Fleet page lists the inbound relay pod by name with runtime kubernetes
and offers the kubectl rollout restart command.
8. More than one inbound relay pod
Two or more inbound relay pods share pair state in ElastiCache for Redis OSS, with cluster mode disabled, TLS, and an AUTH token, in the cluster's private subnets and reachable from the cluster security group:
- bash
- PowerShell
VPC=$(aws eks describe-cluster --name $CLUSTER --query cluster.resourcesVpcConfig.vpcId --output text)
CLUSTER_SG=$(aws eks describe-cluster --name $CLUSTER \
  --query cluster.resourcesVpcConfig.clusterSecurityGroupId --output text)
PRIVATE_SUBNETS=$(aws ec2 describe-subnets \
  --filters "Name=tag:alpha.eksctl.io/cluster-name,Values=$CLUSTER" "Name=tag:kubernetes.io/role/internal-elb,Values=1" \
  --query 'Subnets[].SubnetId' --output text)
SG_REDIS=$(aws ec2 create-security-group --vpc-id $VPC --group-name mte-api-relay-eks-redis \
  --description "MTE API Relay on EKS, Redis" --query GroupId --output text)
aws ec2 authorize-security-group-ingress --group-id $SG_REDIS --protocol tcp --port 6379 --source-group $CLUSTER_SG
aws elasticache create-cache-subnet-group --cache-subnet-group-name mte-api-relay-eks \
  --cache-subnet-group-description "MTE API Relay on EKS" --subnet-ids $PRIVATE_SUBNETS
REDIS_TOKEN=$(openssl rand -hex 32)
aws elasticache create-replication-group --replication-group-id mte-api-relay-eks \
  --replication-group-description "MTE API Relay on EKS pair state" \
  --engine redis --cache-node-type cache.t4g.small \
  --num-cache-clusters 2 --automatic-failover-enabled --multi-az-enabled \
  --cache-subnet-group-name mte-api-relay-eks --security-group-ids $SG_REDIS \
  --transit-encryption-enabled --at-rest-encryption-enabled --auth-token "$REDIS_TOKEN"
aws elasticache wait replication-group-available --replication-group-id mte-api-relay-eks
aws elasticache describe-replication-groups --replication-group-id mte-api-relay-eks \
  --query 'ReplicationGroups[0].NodeGroups[0].PrimaryEndpoint.Address' --output text
$VPC = aws eks describe-cluster --name $CLUSTER --query cluster.resourcesVpcConfig.vpcId --output text
$CLUSTER_SG = aws eks describe-cluster --name $CLUSTER `
  --query cluster.resourcesVpcConfig.clusterSecurityGroupId --output text
$PRIVATE_SUBNETS = (aws ec2 describe-subnets `
  --filters "Name=tag:alpha.eksctl.io/cluster-name,Values=$CLUSTER" "Name=tag:kubernetes.io/role/internal-elb,Values=1" `
  --query 'Subnets[].SubnetId' --output text) -split "`t"
$SG_REDIS = aws ec2 create-security-group --vpc-id $VPC --group-name mte-api-relay-eks-redis `
  --description "MTE API Relay on EKS, Redis" --query GroupId --output text
aws ec2 authorize-security-group-ingress --group-id $SG_REDIS --protocol tcp --port 6379 --source-group $CLUSTER_SG
aws elasticache create-cache-subnet-group --cache-subnet-group-name mte-api-relay-eks `
  --cache-subnet-group-description "MTE API Relay on EKS" --subnet-ids $PRIVATE_SUBNETS
$b = New-Object byte[] 32; [Security.Cryptography.RandomNumberGenerator]::Create().GetBytes($b)
$REDIS_TOKEN = -join ($b | ForEach-Object { $_.ToString('x2') })
aws elasticache create-replication-group --replication-group-id mte-api-relay-eks `
  --replication-group-description "MTE API Relay on EKS pair state" `
  --engine redis --cache-node-type cache.t4g.small `
  --num-cache-clusters 2 --automatic-failover-enabled --multi-az-enabled `
  --cache-subnet-group-name mte-api-relay-eks --security-group-ids $SG_REDIS `
  --transit-encryption-enabled --at-rest-encryption-enabled --auth-token $REDIS_TOKEN
aws elasticache wait replication-group-available --replication-group-id mte-api-relay-eks
aws elasticache describe-replication-groups --replication-group-id mte-api-relay-eks `
  --query 'ReplicationGroups[0].NodeGroups[0].PrimaryEndpoint.Address' --output text
Open the panel through the port forward from step 6, and under
Configuration, set REDIS_URL to
rediss://:<REDIS_TOKEN>@<primary endpoint>:6379, then restart the inbound
relay pods and scale them:
- bash
- PowerShell
kubectl -n mte-relay rollout restart deployment/mte-api-relay-inbound
kubectl -n mte-relay rollout status deployment/mte-api-relay-inbound
kubectl -n mte-relay scale deployment/mte-api-relay-inbound --replicas=3
kubectl -n mte-relay rollout status deployment/mte-api-relay-inbound
kubectl -n mte-relay rollout restart deployment/mte-api-relay-inbound
kubectl -n mte-relay rollout status deployment/mte-api-relay-inbound
kubectl -n mte-relay scale deployment/mte-api-relay-inbound --replicas=3
kubectl -n mte-relay rollout status deployment/mte-api-relay-inbound
Each inbound relay pod logs Connected to Redis for state storage when it
starts. The outbound relay keeps its pairs in memory and needs no Redis.
Then hand the replica count to a HorizontalPodAutoscaler and protect the pods during node drains with a PodDisruptionBudget:
- bash
- PowerShell
cat > mte-api-relay-inbound-scaling.yaml <<EOF
apiVersion: autoscaling/v2
kind: HorizontalPodAutoscaler
metadata:
  name: mte-api-relay-inbound
spec:
  scaleTargetRef:
    apiVersion: apps/v1
    kind: Deployment
    name: mte-api-relay-inbound
  minReplicas: 2
  maxReplicas: 6
  metrics:
    - type: Resource
      resource:
        name: cpu
        target:
          type: Utilization
          averageUtilization: 60
---
apiVersion: policy/v1
kind: PodDisruptionBudget
metadata:
  name: mte-api-relay-inbound
spec:
  minAvailable: 1
  selector:
    matchLabels:
      app: mte-api-relay-inbound
EOF
kubectl -n mte-relay apply -f mte-api-relay-inbound-scaling.yaml
kubectl -n mte-relay get hpa mte-api-relay-inbound
@'
apiVersion: autoscaling/v2
kind: HorizontalPodAutoscaler
metadata:
  name: mte-api-relay-inbound
spec:
  scaleTargetRef:
    apiVersion: apps/v1
    kind: Deployment
    name: mte-api-relay-inbound
  minReplicas: 2
  maxReplicas: 6
  metrics:
    - type: Resource
      resource:
        name: cpu
        target:
          type: Utilization
          averageUtilization: 60
---
apiVersion: policy/v1
kind: PodDisruptionBudget
metadata:
  name: mte-api-relay-inbound
spec:
  minAvailable: 1
  selector:
    matchLabels:
      app: mte-api-relay-inbound
'@ | Set-Content mte-api-relay-inbound-scaling.yaml
kubectl -n mte-relay apply -f mte-api-relay-inbound-scaling.yaml
kubectl -n mte-relay get hpa mte-api-relay-inbound
metrics-server from step 1 feeds the autoscaler: within a minute, TARGETS
shows the pods' CPU percentage against 60, and <unknown> means the pods have
no CPU request or the add on is missing. From here on change minReplicas
instead of running kubectl scale; the autoscaler brings three idle pods back
to two after its five minute scale down window. The budget keeps one inbound relay
pod serving while a node drains, during a node group update for example.
9. Attach AWS WAF
- bash
- PowerShell
cat > waf-rules.json <<'EOF'
[
  {"Name": "AWSManagedRulesAmazonIpReputationList", "Priority": 0,
   "Statement": {"ManagedRuleGroupStatement": {"VendorName": "AWS", "Name": "AWSManagedRulesAmazonIpReputationList"}},
   "OverrideAction": {"None": {}},
   "VisibilityConfig": {"SampledRequestsEnabled": true, "CloudWatchMetricsEnabled": true, "MetricName": "ip-reputation"}},
  {"Name": "AWSManagedRulesCommonRuleSet", "Priority": 1,
   "Statement": {"ManagedRuleGroupStatement": {"VendorName": "AWS", "Name": "AWSManagedRulesCommonRuleSet",
     "RuleActionOverrides": [{"Name": "SizeRestrictions_BODY", "ActionToUse": {"Count": {}}}]}},
   "OverrideAction": {"None": {}},
   "VisibilityConfig": {"SampledRequestsEnabled": true, "CloudWatchMetricsEnabled": true, "MetricName": "common-rule-set"}},
  {"Name": "AWSManagedRulesKnownBadInputsRuleSet", "Priority": 2,
   "Statement": {"ManagedRuleGroupStatement": {"VendorName": "AWS", "Name": "AWSManagedRulesKnownBadInputsRuleSet"}},
   "OverrideAction": {"None": {}},
   "VisibilityConfig": {"SampledRequestsEnabled": true, "CloudWatchMetricsEnabled": true, "MetricName": "known-bad-inputs"}},
  {"Name": "rate-limit-per-ip", "Priority": 3,
   "Statement": {"RateBasedStatement": {"Limit": 2000, "AggregateKeyType": "IP"}},
   "Action": {"Block": {}},
   "VisibilityConfig": {"SampledRequestsEnabled": true, "CloudWatchMetricsEnabled": true, "MetricName": "rate-limit-per-ip"}}
]
EOF
WAF_ARN=$(aws wafv2 create-web-acl --name mte-api-relay-eks --scope REGIONAL --default-action Allow={} \
  --rules file://waf-rules.json \
  --visibility-config SampledRequestsEnabled=true,CloudWatchMetricsEnabled=true,MetricName=mte-api-relay-eks \
  --query Summary.ARN --output text)
kubectl -n mte-relay annotate ingress mte-api-relay-inbound alb.ingress.kubernetes.io/wafv2-acl-arn=$WAF_ARN
@'
[
  {"Name": "AWSManagedRulesAmazonIpReputationList", "Priority": 0,
   "Statement": {"ManagedRuleGroupStatement": {"VendorName": "AWS", "Name": "AWSManagedRulesAmazonIpReputationList"}},
   "OverrideAction": {"None": {}},
   "VisibilityConfig": {"SampledRequestsEnabled": true, "CloudWatchMetricsEnabled": true, "MetricName": "ip-reputation"}},
  {"Name": "AWSManagedRulesCommonRuleSet", "Priority": 1,
   "Statement": {"ManagedRuleGroupStatement": {"VendorName": "AWS", "Name": "AWSManagedRulesCommonRuleSet",
     "RuleActionOverrides": [{"Name": "SizeRestrictions_BODY", "ActionToUse": {"Count": {}}}]}},
   "OverrideAction": {"None": {}},
   "VisibilityConfig": {"SampledRequestsEnabled": true, "CloudWatchMetricsEnabled": true, "MetricName": "common-rule-set"}},
  {"Name": "AWSManagedRulesKnownBadInputsRuleSet", "Priority": 2,
   "Statement": {"ManagedRuleGroupStatement": {"VendorName": "AWS", "Name": "AWSManagedRulesKnownBadInputsRuleSet"}},
   "OverrideAction": {"None": {}},
   "VisibilityConfig": {"SampledRequestsEnabled": true, "CloudWatchMetricsEnabled": true, "MetricName": "known-bad-inputs"}},
  {"Name": "rate-limit-per-ip", "Priority": 3,
   "Statement": {"RateBasedStatement": {"Limit": 2000, "AggregateKeyType": "IP"}},
   "Action": {"Block": {}},
   "VisibilityConfig": {"SampledRequestsEnabled": true, "CloudWatchMetricsEnabled": true, "MetricName": "rate-limit-per-ip"}}
]
'@ | Set-Content waf-rules.json
$WAF_ARN = aws wafv2 create-web-acl --name mte-api-relay-eks --scope REGIONAL --default-action "Allow={}" `
  --rules file://waf-rules.json `
  --visibility-config 'SampledRequestsEnabled=true,CloudWatchMetricsEnabled=true,MetricName=mte-api-relay-eks' `
  --query Summary.ARN --output text
kubectl -n mte-relay annotate ingress mte-api-relay-inbound "alb.ingress.kubernetes.io/wafv2-acl-arn=$WAF_ARN"
The load balancer controller attaches the web ACL within a minute. In
production, also allow only the calling side's NAT addresses. For the
first seconds after the web ACL is created, kubectl -n mte-relay describe ingress mte-api-relay-inbound can show AssociateWebACL errors with status 400 while the
new web ACL propagates; the controller retries until it attaches. The common
rule set's SizeRestrictions_BODY rule is set to Count, because it would block
pairing requests and any encrypted body over 8 KB; see
Production architecture.
10. Run the outbound relay
The outbound relay runs next to your calling service. This walkthrough runs it
in the same cluster and namespace, with the mte-relay service account from
step 2. In production it runs in the calling side's own cluster, which needs
its own subscription and steps 1 and 2 first. It is standalone: its one route
is in DOMAIN_MAP, its pairs stay in memory, and it needs no Redis and no
control plane. The key, mte-api-relay-outbound, is the host your service
uses to call it, and upstream is the inbound relay's https:// address:
- bash
- PowerShell
cat > mte-api-relay-outbound.yaml <<EOF
apiVersion: apps/v1
kind: Deployment
metadata:
  name: mte-api-relay-outbound
spec:
  replicas: 1
  selector:
    matchLabels:
      app: mte-api-relay-outbound
  template:
    metadata:
      labels:
        app: mte-api-relay-outbound
    spec:
      serviceAccountName: mte-relay # IRSA: RegisterUsage
      terminationGracePeriodSeconds: 45
      securityContext:
        runAsNonRoot: true
        runAsUser: 65532
        runAsGroup: 65532
        seccompProfile:
          type: RuntimeDefault
      containers:
        - name: relay
          image: $IMAGE
          securityContext:
            allowPrivilegeEscalation: false
            readOnlyRootFilesystem: true
            capabilities:
              drop: ["ALL"]
          resources:
            requests:
              cpu: 500m
              memory: 512Mi
            limits:
              memory: 1Gi
          env:
            - name: DOMAIN_MAP
              value: '{ "mte-api-relay-outbound": { "upstream": "https://inbound-relay.example.com", "outbound": true } }'
          ports:
            - containerPort: 8080
              name: relay
            - containerPort: 9091
              name: probe
          readinessProbe:
            httpGet: { path: /readyz, port: probe }
            periodSeconds: 5
          livenessProbe:
            httpGet: { path: /healthz, port: probe }
            initialDelaySeconds: 5
            periodSeconds: 10
---
apiVersion: v1
kind: Service
metadata:
  name: mte-api-relay-outbound
spec:
  selector:
    app: mte-api-relay-outbound
  ports:
    - port: 8080
      targetPort: relay
EOF
kubectl -n mte-relay apply -f mte-api-relay-outbound.yaml
kubectl -n mte-relay rollout status deployment/mte-api-relay-outbound
kubectl -n mte-relay run curl --rm -i --restart=Never --image=curlimages/curl:8.10.1 -- \
  curl -s http://mte-api-relay-outbound:8080/todos/1
@"
apiVersion: apps/v1
kind: Deployment
metadata:
  name: mte-api-relay-outbound
spec:
  replicas: 1
  selector:
    matchLabels:
      app: mte-api-relay-outbound
  template:
    metadata:
      labels:
        app: mte-api-relay-outbound
    spec:
      serviceAccountName: mte-relay # IRSA: RegisterUsage
      terminationGracePeriodSeconds: 45
      securityContext:
        runAsNonRoot: true
        runAsUser: 65532
        runAsGroup: 65532
        seccompProfile:
          type: RuntimeDefault
      containers:
        - name: relay
          image: ${IMAGE}
          securityContext:
            allowPrivilegeEscalation: false
            readOnlyRootFilesystem: true
            capabilities:
              drop: ["ALL"]
          resources:
            requests:
              cpu: 500m
              memory: 512Mi
            limits:
              memory: 1Gi
          env:
            - name: DOMAIN_MAP
              value: '{ "mte-api-relay-outbound": { "upstream": "https://inbound-relay.example.com", "outbound": true } }'
          ports:
            - containerPort: 8080
              name: relay
            - containerPort: 9091
              name: probe
          readinessProbe:
            httpGet: { path: /readyz, port: probe }
            periodSeconds: 5
          livenessProbe:
            httpGet: { path: /healthz, port: probe }
            initialDelaySeconds: 5
            periodSeconds: 10
---
apiVersion: v1
kind: Service
metadata:
  name: mte-api-relay-outbound
spec:
  selector:
    app: mte-api-relay-outbound
  ports:
    - port: 8080
      targetPort: relay
"@ | Set-Content mte-api-relay-outbound.yaml
kubectl -n mte-relay apply -f mte-api-relay-outbound.yaml
kubectl -n mte-relay rollout status deployment/mte-api-relay-outbound
kubectl -n mte-relay run curl --rm -i --restart=Never --image=curlimages/curl:8.10.1 -- `
  curl -s http://mte-api-relay-outbound:8080/todos/1
The last command calls the outbound relay the way your service will, by its
Service name, and prints your API's answer after the round trip through the
inbound relay. The outbound Service is ClusterIP: never expose it outside
the cluster, because anything that reaches it can call your API through the
chain.
Operate it on EKS
- Restart fields:
kubectl -n mte-relay rollout restart deployment/mte-api-relay-inbound, thenkubectl -n mte-relay rollout status deployment/mte-api-relay-inbound. - A new release: change the image tag in
mte-api-relay.yamland apply it. The control plane restarts first because of itsRecreatestrategy; relay pods keep serving their last configuration meanwhile. - Start order: a relay pod that starts while the control plane is down
stays
0/1and out of the load balancer until the control plane answers; it is not restarted. - The control plane volume: an EBS volume lives in one Availability Zone, so the control plane pod always runs on a node in that zone. Keep the node group in every zone it uses, and back the volume up with AWS Backup or EBS snapshots.
- Node group updates: the PodDisruptionBudget from step 8 keeps one relay pod in service while nodes drain. The control plane pod moves with its volume and is down for about a minute; relay pods keep serving meanwhile.
- Logs:
aws logs tail /aws/containerinsights/$CLUSTER/application --followshows every pod's log from CloudWatch; the add on also writesdataplane,host, andperformancegroups under the same prefix. - Panel access: keep using
kubectl port-forward; never expose port 8081 through an Ingress. The forward is tied to one pod: when the control plane pod is replaced, it stops witherror: lost connection to pod, and you run the same command again.
Clean up
- bash
- PowerShell
kubectl -n mte-relay delete ingress mte-api-relay-inbound
kubectl delete namespace mte-relay
helm -n kube-system uninstall aws-load-balancer-controller
aws wafv2 delete-web-acl --name mte-api-relay-eks --scope REGIONAL \
  --id $(aws wafv2 list-web-acls --scope REGIONAL --query "WebACLs[?Name=='mte-api-relay-eks'].Id" --output text) \
  --lock-token $(aws wafv2 list-web-acls --scope REGIONAL --query "WebACLs[?Name=='mte-api-relay-eks'].LockToken" --output text)
aws elasticache delete-replication-group --replication-group-id mte-api-relay-eks
aws elasticache wait replication-group-deleted --replication-group-id mte-api-relay-eks
aws elasticache delete-cache-subnet-group --cache-subnet-group-name mte-api-relay-eks
aws ec2 delete-security-group --group-id $(aws ec2 describe-security-groups \
  --filters Name=group-name,Values=mte-api-relay-eks-redis --query 'SecurityGroups[0].GroupId' --output text)
eksctl delete cluster -f cluster.yaml --wait
aws iam delete-policy --policy-arn arn:aws:iam::$ACCOUNT:policy/AWSLoadBalancerControllerIAMPolicy
for g in application dataplane host performance; do
  aws logs delete-log-group --log-group-name /aws/containerinsights/$CLUSTER/$g
done
kubectl -n mte-relay delete ingress mte-api-relay-inbound
kubectl delete namespace mte-relay
helm -n kube-system uninstall aws-load-balancer-controller
aws wafv2 delete-web-acl --name mte-api-relay-eks --scope REGIONAL `
  --id (aws wafv2 list-web-acls --scope REGIONAL --query "WebACLs[?Name=='mte-api-relay-eks'].Id" --output text) `
  --lock-token (aws wafv2 list-web-acls --scope REGIONAL --query "WebACLs[?Name=='mte-api-relay-eks'].LockToken" --output text)
aws elasticache delete-replication-group --replication-group-id mte-api-relay-eks
aws elasticache wait replication-group-deleted --replication-group-id mte-api-relay-eks
aws elasticache delete-cache-subnet-group --cache-subnet-group-name mte-api-relay-eks
aws ec2 delete-security-group --group-id (aws ec2 describe-security-groups `
  --filters 'Name=group-name,Values=mte-api-relay-eks-redis' --query 'SecurityGroups[0].GroupId' --output text)
eksctl delete cluster -f cluster.yaml --wait
aws iam delete-policy --policy-arn "arn:aws:iam::${ACCOUNT}:policy/AWSLoadBalancerControllerIAMPolicy"
foreach ($g in 'application', 'dataplane', 'host', 'performance') {
  aws logs delete-log-group --log-group-name "/aws/containerinsights/$CLUSTER/$g"
}
Delete the Ingress first, so the controller removes the load balancer before the cluster goes away. The CloudWatch Observability add on's log groups outlive the cluster, so the loop removes them.
Other runtimes
The Marketplace image stops at startup anywhere RegisterUsage is not
available. Docker, Podman, K3s, Docker Swarm, OpenShift, and EC2 without ECS
run the on premise image instead.
Server Configuration
Routing lives in DOMAIN_MAP. The inbound relay uses ordinary entries; the
outbound relay uses entries with outbound: true whose upstream is the
inbound relay. The on premise guide
walks through both.
- DOMAIN_MAP: every field, and outbound domains.
- Environment variables: every setting and its default, including the outbound pair pool.
Usage Guide
Point your service at the outbound relay instead of the destination API, and keep the path and query the same. No special request headers are needed; the host your service uses selects the outbound entry.
- bash
- PowerShell
# Before
curl -X GET https://api.partner.example.com/data

# After, with an outbound entry keyed on partner-api
curl -X GET http://partner-api/data
# Before
curl.exe -X GET https://api.partner.example.com/data

# After, with an outbound entry keyed on partner-api
curl.exe -X GET http://partner-api/data
Testing and Health Checks
GET /api/mte-echoandHEAD /api/mte-echoon port 8080 answer for anyHost, outside every rate limit, with{"message":"true","timestamp":"2026-01-04T10:30:45.123456789Z"};?msg=testmakes"message":"test", always a JSON string. Any other method gets405withAllow: GET, HEAD.GET /healthzon port 9091 answers200{"status":"ok","phase":"<phase>"}for as long as the process runs.GET /readyzon port 9091 answers200{"status":"ready","phase":"ready"}while the relay takes traffic, or503{"status":"not_ready","phase":"<phase>","reason":"<code>"}otherwise, withreasononly when there is one. Both takeGETandHEAD. Keep the probe port off public networks: it is for the orchestrator or load balancer only.- Health check path for scanners and load balancers:
HEALTH_CHECK_PATH, off by default, mounts a health answer on port 8080 at a path you pick, for example/health.GETandHEADthere answer200{"status":"ready"}while the relay serves and503{"status":"not_ready"}once shutdown begins, for anyHostand outside every rate limit. Use it for a load balancer or a security scanner that can only reach the relay port, and pick a path the origin does not use. See Health checks and scanners. - A request through the outbound relay reaches the destination API.
Every probe, echo, and health check path answer carries
Content-Type: application/json,
Cache-Control: no-store, no-transform, private, and
X-Content-Type-Options: nosniff; the echo adds X-MTE-Relay-Request-Id.
Monitoring
MTE API Relay v5 writes structured JSON logs. When ECS sends them to CloudWatch Logs, the Grafana dashboard for CloudWatch Logs Insights and the other assets under Monitoring and Integrations apply.
Troubleshooting
| Symptom | Cause and fix |
|---|---|
Tasks stop seconds after they start. The log shows AccessDeniedException and not authorized to perform: aws-marketplace:RegisterUsage, then Startup RegisterUsage failed. | The task role lacks the permission. Attach AWSMarketplaceMeteringRegisterUsage to the role in taskRoleArn, not to the execution role. |
The same stop with CustomerNotEntitledException. | The account has no active subscription to this listing. Subscribe, or wait a few minutes after subscribing. Each account that runs a relay needs its own subscription. |
The same stop with PlatformNotSupportedException. | The container is not on ECS, Fargate, or EKS. Run the on premise image there. |
Tasks stop with CannotPullContainerError. | The subnets cannot reach the internet: use public subnets with assignPublicIp=ENABLED, or private subnets with a NAT gateway. With You are not entitled to pull this AWS Marketplace product image, the account is not subscribed. |
Inbound relay tasks answer 503 on /readyz with reason control_plane_unreachable, and log invalid header field value for "Authorization". | CONTROL_PLANE_TOKEN contains a newline or another control character. Write the parameter again without it, then run update-service --force-new-deployment on both services. |
Inbound relay tasks answer 503 with reason control_plane_unreachable and no header error. | Service Connect is not enabled on the inbound service, the namespaces differ, or $SG_CP does not allow 8081 from $SG_RELAY. |
Inbound relay tasks answer 503 with reason control_plane_unauthorized. | The two services read different token values. Point both task definitions at the same parameter. |
| The load balancer marks every target unhealthy, and ECS replaces inbound tasks in a loop. | No host is saved yet, or the control plane was not running when the tasks started, so /readyz answers 503 by design. Run the setup wizard, or start the control plane, and the next tasks pass. Also check that $SG_RELAY allows 9091 from the load balancer. |
describe-services shows the inbound deployment with rolloutState FAILED and an ECS deployment circuit breaker reason, and the service runs the previous task definition. | The new tasks never passed the load balancer health check: a wrong image tag, the control plane down, or no host saved. The circuit breaker from step 9 rolled back. Fix the cause and run update-service again. |
The control plane task stops with ResourceInitializationError: failed to invoke EFS utils commands and access denied by server while mounting. | The file system has a policy and the task definition's authorizationConfig says "iam": "DISABLED", or the policy names another role or access point. Set iam to ENABLED and check the policy against the task role and the access point from step 3. |
The control plane exits at startup with permission denied under /data. | The data directory is not writable by user 65532. Mount it through the EFS access point from step 3. |
| The outbound relay exits at startup. | The log names the setting. An outbound entry with an http:// upstream needs allow_plain_upstream. |
480 no_domain_for_host. | No DOMAIN_MAP key matches the host the request used. On the inbound side, add the host under Proxies. |
502 with a cause. | The inbound relay or the API failed; cause holds the inbound relay's code. |
Inbound relay tasks or pods stay unready and log redis state store: failed to connect to Redis: NOAUTH Authentication required. | REDIS_URL has no AUTH token or the wrong one. Save it again under Configuration as rediss://:<token>@<primary endpoint>:6379; the relay retries on its own and starts once the token matches. |
| Redis connection issues. | ElastiCache must be in the same VPC and allow 6379 from the inbound relay tasks or, on EKS, from the cluster security group. |
On EKS, pods gain four opentelemetry-auto-instrumentation-* init containers after a restart, and kubectl logs prints Defaulted container. | The CloudWatch Observability add on's Application Signals auto monitor annotated the Deployment. Set monitorAllServices to false as in step 1; within a minute the add on removes its instrumentation.opentelemetry.io/inject-* and cloudwatch.aws.amazon.com/auto-annotate-* annotations and restarts the Deployment clean. Remove any that remain with kubectl annotate. |
Set LOG_LEVEL to debug for more detail, under Configuration for the
inbound relay and in the outbound relay's environment, and see
Errors and recovery.
Security
Container Hardening
- Minimal base image. The runtime image uses Google's
Distroless
cc-debian12base, with no shell, package manager, or general purpose OS utilities. - Multi stage build. Build tooling and source never ship in the final image; only the compiled binary is copied forward.
- Unprivileged runtime. The container runs as the
nonrootuser. - Small listening surface. The image declares ports
8080,9091, and9090. The probe listener on 9091 opens unlessPROBE_PORT=0, and the Prometheus listener opens only whenMETRICS_PORTis set,9090by convention.
Secrets and network
CONTROL_PLANE_TOKENandADMIN_PWstay in SSM Parameter Store asSecureStringvalues, and ECS injects them at startup.- The panel holds the client secrets and, with Redis, the Redis URL. Keep port 8081 inside the VPC, and see Security on the control plane page.
Vulnerability Scanning
Container images are scanned for known vulnerabilities with Docker Scout prior to release. Scan reports for the current image tag are available from Eclypses Support on request (see Support).
When the image is in Amazon ECR, you can also generate native scan evidence by enabling Amazon ECR enhanced scanning (AWS Inspector) on the repository or image.
Costs
| AWS Service | Purpose |
|---|---|
| AWS Marketplace | The listing's container hour price for every running container: inbound and outbound relay tasks and the control plane alike |
| ECS on Fargate, or EKS | Container orchestration |
| Elastic Load Balancing | Traffic across inbound relay tasks, with TLS |
| Amazon EFS | The control plane's stored configuration |
| AWS Cloud Map | The Service Connect namespaces |
| ElastiCache (Redis) | Shared pair state for two or more inbound tasks |
| CloudWatch | Logging and monitoring |
| VPC | Networking isolation, and a NAT gateway for private subnets |
Maintenance
Release Cadence
Updated container images are published on an as needed basis, when new
features, dependency updates, or fixes warrant a release. Security patches are
issued out of band as needed and are not tied to a fixed calendar cadence. Each
release is versioned; see the image tag, for example 5.0.5.
Patch SLA
Eclypses' commitment for security patches:
- Critical vulnerabilities are addressed in a patched image within 30 days of confirmed disclosure.
- Lower severity issues are addressed in a subsequent release.
To apply an update, reference the new tag in your ECS task definitions or EKS manifests, on both relays of the chain; see Updates and restarts.
Fault Recovery
ECS replaces a relay task that stops. The outbound relay pairs with the inbound relay again on its next request. While the control plane is down, inbound relay tasks keep serving their last configuration.
Secret Rotation
Rotate each inbound entry's client_id_secret on a schedule that fits your
security policy. After a change, the outbound relay authenticates and pairs
again.
Service Limits
- ECS: ECS Service Quotas
- CloudWatch: CloudWatch Limits
- ELB: Load Balancer Limits
Support
MTE API Relay is a commercially supported product from Eclypses. Support and security patch SLAs (including the 30 day critical patch commitment described under Maintenance) are provided to licensed and subscribed customers. For escalations, scan reports, or hardening documentation, contact Eclypses Support:
- Email: customer_support@eclypses.com
- Hours: Monday to Friday, 8:00 AM to 5:00 PM MST (excluding holidays)