MTE API Relay on Oracle Cloud Infrastructure
Introduction
MTE API Relay is an end to end encryption system that protects HTTP traffic between server applications. It acts as a proxy server in front of your backend services, communicating with another API Relay instance to encode and decode all proxied traffic. This enables secure application to application communications using the Eclypses MTE encryption engine.
Below is a typical architecture where one server application communicates through an MTE API Relay container, which transmits proxied traffic to another API Relay that decodes and forwards the request to its target backend service:
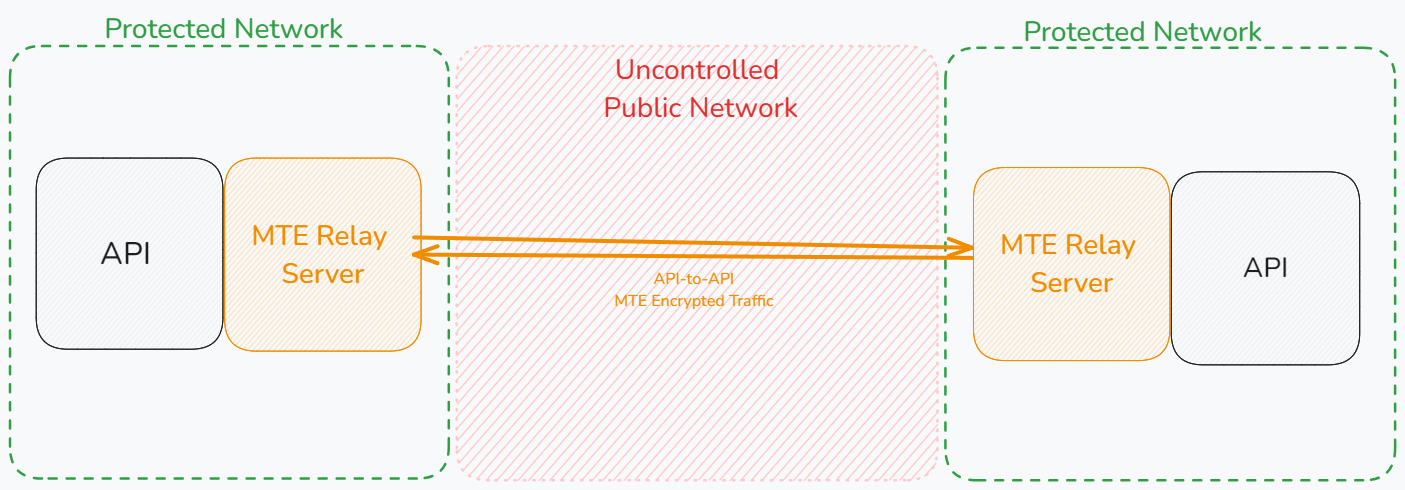
MTE API Relay instances are only compatible with each other. Neither an MTE Relay Server nor an MTE Client SDK can communicate with an MTE API Relay. MTE API Relays are strictly for server to server communications.
On Oracle Cloud Infrastructure (OCI), the same Docker image used for on premise deployments can be launched two ways:
- OCI Container Instances, Oracle's managed container runtime for running containers without managing servers or a cluster.
- Oracle Kubernetes Engine (OKE), Oracle's managed Kubernetes service, for orchestrated, scalable deployments.
Both options pull the image from the Oracle Cloud Infrastructure Registry (OCIR) in your own tenancy. The first sections below cover pulling the image from Eclypses and pushing it into OCIR; after that, follow Option A for Container Instances or Option B for OKE.
Prerequisites
Technical Requirements
- An existing backend service that accepts HTTP calls.
- We provide a demo using a Postman Collection and https://jsonplaceholder.typicode.com.
- An OCI tenancy with permission to use the Container Registry (OCIR) and either Container Instances or an OKE cluster.
- Docker installed and running on your system.
- AWS CLI installed (used only to pull the image from the Eclypses registry).
- OCI CLI installed (optional for the console workflow, required for the CLI examples).
kubectlinstalled if deploying to OKE.
Skills and Knowledge
- Familiarity with Docker and/or Kubernetes.
- Basic knowledge of OCI networking (VCNs, subnets, security lists).
Credentials
- An AWS Access Key ID and AWS Secret Access Key provided by Eclypses to access the private container repository.
- An OCI auth token for logging Docker into OCIR (created below).
Step 1: Pull the Image from Eclypses
Configure AWS CLI Access
Configure a new AWS CLI profile with the Eclypses issued credentials:
aws configure --profile eclypses-customer-on-prem
When prompted:
- AWS Access Key ID: Enter the ID provided by Eclypses.
- AWS Secret Access Key: Enter the secret key provided.
- Default region name: us-east-1
- Default output format: json
Pull the Docker Image
Authenticate Docker with the Eclypses ECR registry:
- bash
- PowerShell
aws ecr get-login-password \
--region us-east-1 \
--profile eclypses-customer-on-prem \
| docker login --username AWS \
--password-stdin 321186633847.dkr.ecr.us-east-1.amazonaws.com
aws ecr get-login-password `
--region us-east-1 `
--profile eclypses-customer-on-prem `
| docker login --username AWS `
--password-stdin 321186633847.dkr.ecr.us-east-1.amazonaws.com
Then pull the image:
docker pull 321186633847.dkr.ecr.us-east-1.amazonaws.com/customer/on-prem/mte-api-relay:4.7.0
Step 2: Push the Image to OCIR
OCI services pull images most reliably from the Container Registry in your own tenancy. Authorization tokens for the Eclypses registry expire after 12 hours, so pointing Container Instances or OKE directly at the Eclypses repository is not practical. Instead, pull the image once and push it into OCIR, then deploy from there.
1. Create an Auth Token
In the OCI Console, open your profile menu, select My profile, then select Auth tokens and generate a new token. Copy the value immediately; it is only shown once. Store it in a password manager.
2. Find Your Tenancy Namespace
The tenancy namespace (also called the Object Storage namespace) is part of every OCIR image path. Retrieve it with the OCI CLI:
oci os ns get
It is also shown in the console under Tenancy details.
3. Log Docker into OCIR
OCIR registry hostnames follow the pattern <region-key>.ocir.io, for
example iad.ocir.io for US East (Ashburn) or phx.ocir.io for US West
(Phoenix). Log in using your tenancy namespace and user name, with the
auth token as the password:
docker login <region-key>.ocir.io
- Username:
<tenancy-namespace>/<username>- Example:
mytenancy/first.last@company.com - Federated users include the identity provider:
<tenancy-namespace>/oracleidentitycloudservice/<username>
- Example:
- Password: the auth token created above.
4. Tag and Push
docker tag 321186633847.dkr.ecr.us-east-1.amazonaws.com/customer/on-prem/mte-api-relay:4.7.0 <region-key>.ocir.io/<tenancy-namespace>/mte-api-relay:4.7.0
docker push <region-key>.ocir.io/<tenancy-namespace>/mte-api-relay:4.7.0
If the mte-api-relay repository does not already exist in OCIR, the
push creates it automatically in your root compartment (when your user has
permission to manage repositories). You can also create the repository
first under Developer Services, Container Registry, and choose
whether it is private (recommended) or public.
Server Configuration
MTE API Relay is configured using environment variables.
Using a DOMAIN_MAP (Recommended)
Use the DOMAIN_MAP Builder tool to configure your domains visually, validate your settings, and copy a DOMAIN_MAP value that is ready to use, with no manual JSON editing required.
The DOMAIN_MAP environment variable is a JSON string that maps the host of incoming requests to its upstream services. It is capable of handling multiple domains with different upstreams and settings.
Example of an inbound relay paired with an outbound relay:
{
  "inbound-relay.example.com": {
    "upstream": "http://internal-service",
    "client_id_secret": "8KeJmtuKweUhymNJmGHvGMrJCUtHxhQG",
    "pass_through_routes": ["/health"]
  },
  "outbound-relay.example.internal": {
    "outbound_token": "s3cr3tT0k3nV4lu3"
  }
}
Using individual Environment Variables (Legacy)
Using these environment variables will result in the relay being configured to only handle a single domain. This method is deprecated in favor of using the DOMAIN_MAP variable. If both are provided, DOMAIN_MAP will take precedence.
Example:
UPSTREAM- Upstream API or service URL.CLIENT_ID_SECRET- Secret for signing client IDs (minimum 32 characters).PASS_THROUGH_ROUTES- Comma separated list of routes proxied without encoding/decoding.OUTBOUND_TOKEN- Token for authenticating outbound requests.
UPSTREAM='https://api.my-company.com'
CLIENT_ID_SECRET='2DkV4DDabehO8cifDktdF9elKJL0CKrk'
PASS_THROUGH_ROUTES='/health,/version'
OUTBOUND_TOKEN='s3cr3tT0k3nV4lu3'
Additional Environment Variables
PORT- Default:8080.LOG_LEVEL- One of trace, debug, info, warning, error, panic, disabled. Default:info.HEADERS- A JSON string of additional headers to add to upstream requests.REDIS_URL- Connection string for a shared Redis instance. Required when running more than one relay replica.
Deployment Steps
An MTE API Relay deployment always involves two relay instances: an outbound relay near the calling application and an inbound relay near the target API. On OCI, the outbound relay usually lives in a private subnet and is only reachable from your own services, while the inbound relay is published behind a load balancer or public IP so its partner can reach it. The steps below work for either role; the notes call out where they differ.
Option A: OCI Container Instances
Container Instances run containers directly on managed infrastructure with no cluster, virtual machine, or control plane to operate. This is the fastest way to stand up a relay on OCI and is well suited to evaluations and lower traffic workloads.
1. Create the Container Instance
In the OCI Console, go to Developer Services, Containers & Artifacts, Container Instances, and select Create container instance.
- Name and compartment: for example
mte-api-relay. - Shape:
CI.Standard.E4.Flexwith 1 OCPU and 4 GB of memory is a good starting point. - Networking: select your VCN and subnet. For an inbound relay used in a quick evaluation, use a public subnet and keep Assign a public IPv4 address checked. An outbound relay belongs in a private subnet with no public IP.
2. Configure the Container
- Image: select OCIR and browse to
<region-key>.ocir.io/<tenancy-namespace>/mte-api-relay:4.7.0. If the repository is private, provide the OCIR credentials (<tenancy-namespace>/<username>and your auth token) when prompted. - Environment variables: add
DOMAIN_MAPwith your configuration as a single line of JSON. While testing an inbound relay against the public IP, a wildcard key is easiest:
{ "*": { "upstream": "__YOUR_UPSTREAM_URL__", "client_id_secret": "__YOUR_CLIENT_ID_SECRET__", "outbound_token": "__YOUR_OUTBOUND_ACCESS_TOKEN__" } }
Then select Create. The instance typically becomes active in under a minute.
3. Open Port 8080
The relay listens on port 8080. Add an ingress rule for TCP port
8080 to the subnet's security list (or to a network security group
attached to the instance). For an inbound relay, allow the source that
hosts your outbound relay; for an outbound relay, allow only your own
application subnets.
4. Test
curl "http://<PUBLIC_IP>:8080/api/mte-echo?msg=test"
Equivalent OCI CLI Command
The same instance can be created from the CLI:
oci container-instances container-instance create \
  --compartment-id <COMPARTMENT_OCID> \
  --availability-domain <AVAILABILITY_DOMAIN> \
  --display-name mte-api-relay \
  --shape CI.Standard.E4.Flex \
  --shape-config '{"ocpus": 1, "memoryInGBs": 4}' \
  --containers '[{ "imageUrl": "<region-key>.ocir.io/<tenancy-namespace>/mte-api-relay:4.7.0", "displayName": "mte-api-relay", "environmentVariables": { "DOMAIN_MAP": "{ \"*\": { \"upstream\": \"__YOUR_UPSTREAM_URL__\", \"client_id_secret\": \"__YOUR_CLIENT_ID_SECRET__\", \"outbound_token\": \"__YOUR_OUTBOUND_ACCESS_TOKEN__\" } }" } }]' \
  --vnics '[{ "subnetId": "<SUBNET_OCID>", "isPublicIpAssigned": true }]'
- For production, place an OCI Load Balancer with a TLS certificate
in front of the inbound relay, point your DNS record at it, and key
DOMAIN_MAPon that hostname. - A single container instance keeps pairing state in memory, which is
fine on its own. To run multiple instances behind a load balancer,
all of them must share state: set
REDIS_URLon each instance and point it at OCI Cache (managed Redis) or a Redis server you operate.
Option B: Oracle Kubernetes Engine (OKE)
OKE runs standard Kubernetes, so the relay deploys with ordinary
Kubernetes manifests. A Service of type LoadBalancer automatically
provisions an OCI Load Balancer in front of the pods.
1. Connect kubectl to Your Cluster
Create a kubeconfig entry for your cluster (the exact command is also shown in the console under your cluster's Access Cluster panel):
oci ce cluster create-kubeconfig --cluster-id <CLUSTER_OCID> --file $HOME/.kube/config --region <REGION> --token-version 2.0.0
2. Create an Image Pull Secret
OKE needs credentials to pull from a private OCIR repository. Create a secret using the same OCIR login details from Step 2:
kubectl create secret docker-registry ocir-secret \
  --docker-server=<region-key>.ocir.io \
  --docker-username='<tenancy-namespace>/<username>' \
  --docker-password='<YOUR_AUTH_TOKEN>' \
  --docker-email='<username>'
3. Create the Manifest
The manifest below deploys an inbound relay published through an OCI
Load Balancer. Create a file named mte-api-relay-oke.yaml:
# MTE API Relay container deployment
apiVersion: apps/v1
kind: Deployment
metadata:
  name: mte-api-relay-deployment
spec:
  replicas: 2
  selector:
    matchLabels:
      app: mte-api-relay
  template:
    metadata:
      labels:
        app: mte-api-relay
    spec:
      imagePullSecrets:
        - name: ocir-secret
      containers:
        - name: mte-api-relay
          image: <region-key>.ocir.io/<tenancy-namespace>/mte-api-relay:4.7.0
          ports:
            - containerPort: 8080
          env:
            - name: DOMAIN_MAP
              value: '{ "relay.example.com": { "upstream": "__YOUR_UPSTREAM_URL__", "client_id_secret": "__YOUR_CLIENT_ID_SECRET__", "outbound_token": "__YOUR_OUTBOUND_ACCESS_TOKEN__" } }'  # Update this value!
            - name: REDIS_URL
              value: "redis://my-redis-service:6379"

---

# MTE API Relay Service; type LoadBalancer provisions an OCI Load Balancer
apiVersion: v1
kind: Service
metadata:
  name: mte-api-relay-service
  annotations:
    oci.oraclecloud.com/load-balancer-type: "lb"
    service.beta.kubernetes.io/oci-load-balancer-shape: "flexible"
    service.beta.kubernetes.io/oci-load-balancer-shape-flex-min: "10"
    service.beta.kubernetes.io/oci-load-balancer-shape-flex-max: "100"
spec:
  type: LoadBalancer
  selector:
    app: mte-api-relay
  ports:
    - protocol: TCP
      port: 80           # External port on the OCI Load Balancer
      targetPort: 8080

---

# Redis container deployment
apiVersion: apps/v1
kind: Deployment
metadata:
  name: my-redis-deployment
spec:
  replicas: 1
  selector:
    matchLabels:
      app: my-redis
  template:
    metadata:
      labels:
        app: my-redis
    spec:
      containers:
        - name: redis
          image: redis:7.2
          ports:
            - containerPort: 6379

---

# Redis Service to expose the deployment
apiVersion: v1
kind: Service
metadata:
  name: my-redis-service
spec:
  type: ClusterIP
  selector:
    app: my-redis
  ports:
    - protocol: TCP
      port: 6379
      targetPort: 6379
The above configuration provides these resources:
mte-api-relay-deployment (Deployment): Runs 2 replicas of the mte-api-relay container on port 8080, pulling the image from OCIR with the pull secret.mte-api-relay-service (Service - LoadBalancer): Provisions a flexible shape OCI Load Balancer that forwards external port 80 to container port 8080.my-redis-deployment (Deployment): Runs a single Redis instance on port 6379 so both relay replicas share pairing state.my-redis-service (Service - ClusterIP): Provides internal cluster access to the Redis pod over port 6379.
An outbound relay is called by your own services from inside the cluster
and does not need to be reachable from outside it. Change the relay
service to type: ClusterIP, remove the load balancer annotations, and
key DOMAIN_MAP on the service hostname your applications will call,
such as mte-api-relay-service:8080.
4. Deploy
kubectl apply -f mte-api-relay-oke.yaml
Watch the pods come up and wait for the load balancer to receive an external IP address:
kubectl get pods
kubectl get service mte-api-relay-service --watch
Once EXTERNAL-IP is populated, test the relay:
curl "http://<EXTERNAL_IP>/api/mte-echo?msg=test"
Remember to update the DOMAIN_MAP key to match the hostname the relay
is actually reached by (your DNS name pointing at the load balancer), or
use a wildcard "*" key while testing by IP.
Kubernetes Commands
To check the logs of a running pod, use the command
kubectl logs <POD_NAME>
To scale up the number of replicas, use the command
kubectl scale deployment mte-api-relay-deployment --replicas=<NUMBER_OF_REPLICAS>
To delete the deployment and services (this also deletes the OCI Load Balancer), use the command
kubectl delete -f mte-api-relay-oke.yaml
Sources:
OKE: Pulling Images from Registry
OKE: Defining Load Balancers
Usage Guide
To use MTE API Relay, simply redirect your application's HTTP requests to the Outbound Relay instance and include the required x-mte-* headers. The Outbound Relay will handle encoding the request, forwarding it to the Inbound Relay, and decoding the response before returning it to your application.
Outbound Request Headers
When sending a request to the Outbound Relay, include the following headers:
x-mte-outbound-token: The outbound token configured in the Outbound Relay.x-mte-upstream: The URL of the upstream service, from the perspective of the Outbound Relay. It should be an Inbound Relay URL.
Example Request
Before using MTE API Relay, a normal HTTP request would look like this:
curl -X GET https://api.my-company.com/data
After setting up MTE API Relay, the request to the Outbound Relay would look like this:
curl -X GET https://outbound-relay.my-company.com/data \
  -H "x-mte-outbound-token: __YOUR_OUTBOUND_TOKEN__" \
  -H "x-mte-upstream: https://inbound-relay.my-company.com/data"
- The
x-mte-upstreamheader should point to the Inbound Relay URL, not directly to the backend service. - Only the Domain portion of the URL needs to be updated. The path of the URL can remain the same.
Testing & Health Checks
- Monitor container logs for startup messages
- Use the default or custom echo routes to test container responsiveness:
- Default:
/api/mte-echo - Custom Message:
/api/mte-echo?msg=test
- Default:
Expected response:
{
  "message": "test",
  "timestamp": "<timestamp>"
}
Troubleshooting
- Cannot push to OCIR (401 Unauthorized)
- Verify the Docker login username is
<tenancy-namespace>/<username>and the password is a current auth token, not your console password.
- Verify the Docker login username is
- OKE pods stay in
ImagePullBackOff- The pull secret is missing, misspelled, or not referenced in
imagePullSecrets. Recreateocir-secretand confirm the image URL region and namespace.
- The pull secret is missing, misspelled, or not referenced in
- Requests rejected with 404 or no proxy destination found
- The hostname used to reach the relay does not match a
DOMAIN_MAPkey. Use the exact DNS name or a wildcard"*"key.
- The hostname used to reach the relay does not match a
- Relay unreachable
- Check the subnet security list or NSG for an ingress rule on the relay port, and verify the load balancer health checks are passing.
- Cannot Reach Upstream Service
- Verify the container can resolve and connect to the target host from inside its VCN.
- Redis connection issues
- Ensure
REDIS_URLis reachable from the relay pods or container instances.
- Ensure
Security
Container Hardening
MTE API Relay is built and hardened using the following practices:
- Minimal base image: The runtime image uses Google's
Distroless
cc-debian12base. It contains only the application and its runtime dependencies, with no shell, no package manager, and no general purpose OS utilities, which dramatically reduces the attack surface. - Multi stage build: The application is compiled in a separate
golangbuild stage. Build tooling and source never ship in the final image; only the compiled binary is copied forward. - Unprivileged runtime: The container runs as a dedicated
unprivileged user (
nonroot). No root privileges are required at runtime. - Minimal surface: Only port
8080is exposed, and the image runs a single binary entrypoint. - No persisted secrets: No sensitive data is stored in the container; all configuration is supplied at runtime via environment variables.
- Network isolation: Deploy the inbound relay close to the upstream service to minimize exposure of unencrypted traffic.
Vulnerability Scanning
Container images are scanned for known vulnerabilities with Docker Scout prior to release. Scan reports for the current image tag are available from Eclypses Support on request (see Support).
Because the image is pushed into your own OCIR repository, you can also
generate native scan evidence by enabling
repository scanning with the Oracle Vulnerability Scanning Service
on the mte-api-relay repository. The pulled image can equally be
scanned with any container scanner of your choice (e.g.
Trivy or
Grype) to produce evidence within
your own environment.
Costs
OCI infrastructure costs (Container Instances, OKE worker nodes, load balancers, OCIR storage, and Redis or OCI Cache) are billed to your Oracle Cloud account and are customer managed.
Maintenance
Release Cadence
Updated container images are published on an as needed basis, when new
features, dependency updates, or fixes warrant a release. Security patches
are issued out of band as needed and are not tied to a fixed calendar
cadence. Each release is versioned (see the image tag, e.g. 4.7.0) and
distributed through Eclypses' Amazon ECR repository.
Patch SLA
Eclypses' commitment for security patches:
- Critical vulnerabilities are addressed in a patched image within 30 days of confirmed disclosure.
- Lower severity issues are addressed in a subsequent release.
To receive an updated image, pull the latest tag from the Eclypses ECR repository, push it to your OCIR repository, and redeploy the container instance or update the OKE deployment manifest to reference the new tag.
Fault Recovery
- Relaunch the Relay container; paired API Relays will automatically establish secure communication again.
Key/Variable Rotation Recommendations
- Rotate the
CLIENT_ID_SECRETandOUTBOUND_TOKENevery 90 days as per security best practices.
Support
MTE API Relay is a commercially supported product from Eclypses.
Support and security patch SLAs (including the 30 day critical patch
commitment described under Maintenance) are provided to
licensed/subscribed customers. For escalations, scan reports, or hardening
documentation, contact Eclypses Support:
customer_support@eclypses.com
Monday through Friday, 8:00 AM to 5:00 PM MST (excluding holidays)