MTE API Relay On-Premise Deployment
Introduction
MTE API Relay is an end-to-end encryption system that protects HTTP traffic between server applications. It acts as a proxy server in front of your backend services, communicating with another API Relay instance to encode and decode all proxied traffic. This enables secure application-to-application communications using the Eclypses MTE encryption engine.
Below is a typical architecture where one server application communicates through an MTE API Relay container, which transmits proxied traffic to another API Relay that decodes and forwards the request to its target backend service:
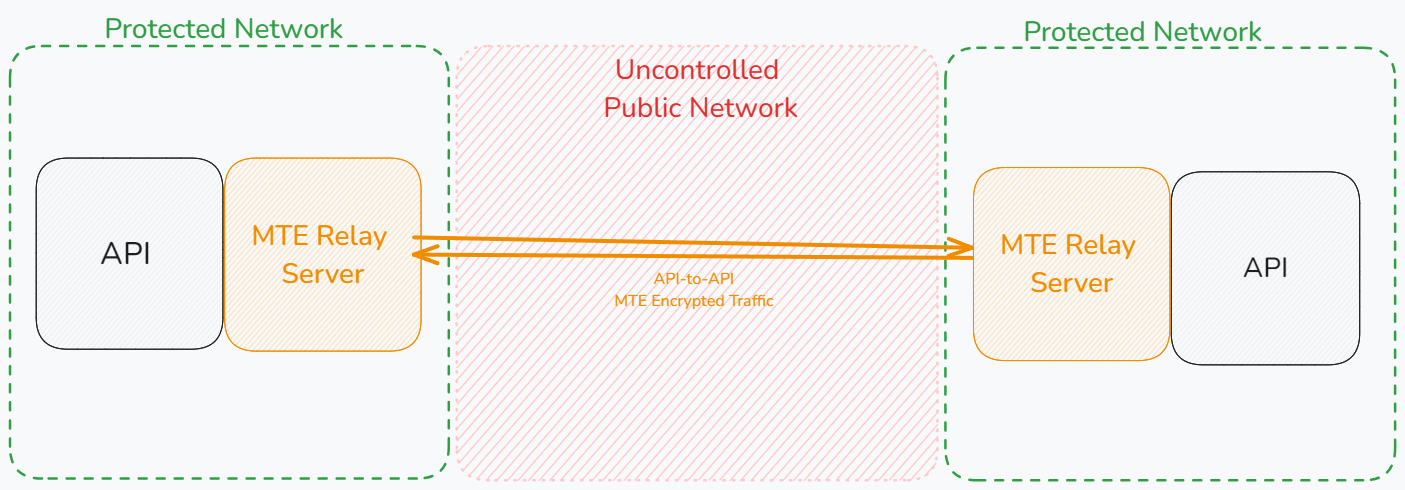
MTE API Relay instances are only compatible with each other. Neither an MTE Relay Server nor an MTE Client SDK can communicate with an MTE API Relay. MTE API Relays are strictly for server-to-server communications.
Prerequisites
Technical Requirements
- An existing backend service that accepts HTTP calls.
- We provide a demo using a Postman Collection and https://jsonplaceholder.typicode.com.
- Docker installed and running on your system.
- AWS CLI installed.
Skills and Knowledge
- Familiarity with Docker and/or Kubernetes.
- General knowledge of container deployment models.
Credentials
- An AWS Access Key ID and AWS Secret Access Key provided by Eclypses to access the private container repository.
Deployment Options
MTE API Relay is provided as a Docker image and can be deployed on-premise using:
- Docker Run
- Docker Compose
- Kubernetes
- OpenShift
- Other container runtimes (e.g., Docker Swarm, Podman, K3s)
1. Configure AWS CLI Access
Configure a new AWS CLI profile with the Eclypses-issued credentials:
aws configure --profile eclypses-customer-on-prem
When prompted:
- AWS Access Key ID: Enter the ID provided by Eclypses.
- AWS Secret Access Key: Enter the secret key provided.
- Default region name: us-east-1
- Default output format: json
2. Pull the Docker Image
Authenticate Docker with the Eclypses ECR registry:
- bash
- PowerShell
aws ecr get-login-password \
--region us-east-1 \
--profile eclypses-customer-on-prem \
| docker login --username AWS \
--password-stdin 321186633847.dkr.ecr.us-east-1.amazonaws.com
aws ecr get-login-password `
--region us-east-1 `
--profile eclypses-customer-on-prem `
| docker login --username AWS `
--password-stdin 321186633847.dkr.ecr.us-east-1.amazonaws.com
Then pull the image:
docker pull 321186633847.dkr.ecr.us-east-1.amazonaws.com/customer/on-prem/mte-api-relay:5.0.0-beta.1
Video Guide
Using a DomainMap (Recommended)
Use the DOMAIN_MAP Builder tool to configure your domains visually, validate your settings, and copy a ready-to-use DOMAIN_MAP value — no manual JSON editing required.
The DOMAIN_MAP environment variable is a JSON string that maps the host of incoming requests to its upstream services. It is capable of handling multiple domains with different upstreams and settings. This is the recommended way to configure MTE Relay Server since v4.5.0.
Example:
DOMAIN_MAP={ "relay1.example.com": { "upstream": "http://service1", "client_id_secret": "bA4aAz&9M7bWesdP&E?fQG4qF2d4cCsw", "cors_origins": ["https://app1.example.com","http://localhost:3000"], "cors_methods": ["GET","POST"], "pass_through_routes": ["/health","/status"], }, "relay2.example.com": { "outbound_token": "bA4aAz&9M7bWesdP&E?fQG4qF2d4cCsw", } }
Where the formatted JSON may look like this:
{
  "relay1.example.com": {
    "upstream": "http://service1",
    "client_id_secret": "bA4aAz&9M7bWesdP&E?fQG4qF2d4cCsw",
    "pass_through_routes": ["/health","/status"],
  },
  "relay2.example.com": {
    "outbound_token": "bA4aAz&9M7bWesdP&E?fQG4qF2d4cCsw",
  }
}
Using individual Environment Variables (Legacy)
Using these environment variables will result in the MTE Relay Server being configured to only handle a single domain. This method is deprecated in favor of using the DOMAIN_MAP variable. If both are provided, DOMAIN_MAP will take precedence.
Example:
UPSTREAM- Upstream API or service URL.CLIENT_ID_SECRET- Secret for signing client IDs (minimum 32 characters).PASS_THROUGH_ROUTES- Comma-separated list of routes proxied without encoding/decoding.OUTBOUND_TOKEN- Token for authenticating outbound requests.
UPSTREAM='https://api.my-company.com'
CLIENT_ID_SECRET='2DkV4DDabehO8cifDktdF9elKJL0CKrk'
PASS_THROUGH_ROUTES='/health,/version'
OUTBOUND_TOKEN='s3cr3tT0k3nV4lu3'
Additional Environment Variables
PORT- Default:8080.LOG_LEVEL- One of trace, debug, info, warning, error, panic, disabled. Default:info.HEADERS- A JSON string of additional headers to add to upstream requests.
Video Guide
Deployment Steps
Option A: Docker Run
Using the docker run command, we can launch a single MTE Relay container locally for testing or local development purposes.
Copy the command below, modify the environment variable values, and run it in your terminal.
- bash
- PowerShell
docker run --rm -it \
  --name mte-api-relay \
  -p 8080:8080 \
  -e DOMAIN_MAP='{ "relay.example.com": { "upstream": "__YOUR_UPSTREAM_URL__", "client_id_secret": "__YOUR_CLIENT_ID_SECRET__", "outbound_token": "__YOUR_SECURE_OUTBOUND_ACCESS_TOKEN__" } }' \
  321186633847.dkr.ecr.us-east-1.amazonaws.com/customer/on-prem/mte-api-relay:5.0.0-beta.1
docker run --rm -it `
  --name mte-api-relay `
  -p 8080:8080 `
  -e DOMAIN_MAP='{ "relay.example.com": { "upstream": "__YOUR_UPSTREAM_URL__", "client_id_secret": "__YOUR_CLIENT_ID_SECRET__", "outbound_token": "__YOUR_SECURE_OUTBOUND_ACCESS_TOKEN__" } }' `
  321186633847.dkr.ecr.us-east-1.amazonaws.com/customer/on-prem/mte-api-relay:5.0.0-beta.1
Command Explanation:
docker run
Runs a container from the specified image.--rm
Automatically removes the container when it exits.-it
Allocates an interactive terminal (-ifor interactive input,-tfor pseudo-TTY).--name mte-relay
Assigns a custom name (mte-relay) to the container.-p 8080:8080
Maps host port8080to container port8080. You may change the host port if needed. Do not change the container port.-e DOMAIN_MAP='...'
Sets theDOMAIN_MAPenvironment variable as a JSON string mapping domains to their configuration (upstream URL, client ID secret, outbound token, etc.).- The last line is the image to run.
Video Guide
Option B: Docker Compose
Docker Compose provides a convenient way to define and manage multi-container applications by allowing you to describe all of your services in a single YAML file. Once defined, Docker Compose can automatically create and start the containers with a single command, ensuring consistency across environments.
Create a new file named docker-compose.yaml with the following content, and update the environment variable values as needed:
version: "3.8"

services:
  mte-api-relay:
    image: 321186633847.dkr.ecr.us-east-1.amazonaws.com/customer/on-prem/mte-api-relay:5.0.0-beta.1
    ports:
      - "8080:8080"
    environment:
      - 'DOMAIN_MAP={ "relay.example.com": { "upstream": "__YOUR_UPSTREAM_URL__", "client_id_secret": "__YOUR_CLIENT_ID_SECRET__", "outbound_token": "__YOUR_OUTBOUND_ACCESS_TOKEN__" } }'  # Update this value!
      - REDIS_URL=redis://redis:6379
    depends_on:
      - redis

  redis:
    image: "redis:alpine"
Docker Compose Commands
To start the services defined in the docker-compose.yaml file, run:
docker compose up
Helpful CLI Flags:
-f- Specify an alternate compose file.- Example:
docker compose -f custom.yml up
- Example:
-d- Run containers in the background.- Example:
docker compose up -d
- Example:
Check running containers with:
docker compose ps
Stop the services with:
docker compose down
Video Guide
In production environments, it may be better to use a Docker Swarm cluster for improved scalability, isolation of services, rolling updates, and management.
Sources:
Docker Compose Documentation
Docker Compose CLI
Option C: Kubernetes
Kubernetes provides a powerful system for automating the deployment, scaling, and management of containerized applications. By defining resources in YAML files, it ensures reliability, scalability, and consistency across environments.
Create a file named mte-api-relay-deployment.yaml with the following content:
# MTE Relay container deployment
apiVersion: apps/v1
kind: Deployment
metadata:
  name: mte-api-relay-deployment
spec:
  replicas: 2
  selector:
    matchLabels:
      app: mte-api-relay
  template:
    metadata:
      labels:
        app: mte-api-relay
    spec:
      containers:
        - name: mte-api-relay
          image: 321186633847.dkr.ecr.us-east-1.amazonaws.com/customer/on-prem/mte-api-relay:5.0.0-beta.1
          ports:
            - containerPort: 8080
          env:
            - name: DOMAIN_MAP
              value: '{ "relay.example.com": { "upstream": "__YOUR_UPSTREAM_URL__", "client_id_secret": "__YOUR_CLIENT_ID_SECRET__", "outbound_token": "__YOUR_OUTBOUND_ACCESS_TOKEN__" } }'  # Update this value!
            - name: REDIS_URL
              value: "redis://my-redis-service:6379"

---

# MTE Relay Service to expose the deployment
apiVersion: v1
kind: Service
metadata:
  name: mte-api-relay-service
spec:
  type: LoadBalancer
  selector:
    app: mte-api-relay
  ports:
    - protocol: TCP
      port: 8080
      targetPort: 8080


---

# Redis container deployment
apiVersion: apps/v1
kind: Deployment
metadata:
  name: my-redis-deployment
spec:
  replicas: 1
  selector:
    matchLabels:
      app: my-redis
  template:
    metadata:
      labels:
        app: my-redis
    spec:
      containers:
        - name: redis
          image: redis:7.2
          ports:
            - containerPort: 6379

---

# Redis Service to expose the deployment
apiVersion: v1
kind: Service
metadata:
  name: my-redis-service
spec:
  type: ClusterIP
  selector:
    app: my-redis
  ports:
    - protocol: TCP
      port: 6379
      targetPort: 6379
The above configuration provides these resources:
mte-relay-deployment (Deployment): Runs 2 replicas of the mte-relay-server container, exposing port 8080 with the DOMAIN_MAP environment variable for domain-to-upstream configuration and Redis connection.mte-relay-service (Service - LoadBalancer): Exposes the mte-relay pods externally on port 80, forwarding traffic to container port 8080.my-redis-deployment (Deployment): Runs a single Redis instance on port 6379.my-redis-service (Service - ClusterIP): Provides internal cluster access to the Redis pod over port 6379.
Adding the Control Plane
MTE Relay 5.0.0-beta.1 can be managed at runtime from a web admin panel.
The panel is a second deployment: the same image started with MODE=control,
with a small volume of its own. It is optional, and the manifest above runs
without it. See Control Plane for
what the panel does and how configuration reaches the workers.
Create a file named mte-relay-control-plane.yaml with the following
content:
# Shared worker token and admin password
apiVersion: v1
kind: Secret
metadata:
  name: mte-relay-control-plane
type: Opaque
stringData:
  CONTROL_PLANE_TOKEN: "__YOUR_SHARED_WORKER_TOKEN__"  # Update this value!
  ADMIN_PW: "__YOUR_ADMIN_PASSWORD__"                  # Update this value!

---

# Storage for the override document and the admin session signing secret
apiVersion: v1
kind: PersistentVolumeClaim
metadata:
  name: mte-relay-control-plane-data
spec:
  accessModes: ["ReadWriteOnce"]
  resources:
    requests:
      storage: 100Mi

---

# Control plane deployment. Always one replica: the override document is a
# single file written by a single process, with no cross process locking.
apiVersion: apps/v1
kind: Deployment
metadata:
  name: mte-relay-control-plane
spec:
  replicas: 1
  strategy:
    type: Recreate          # never two pods writing the same volume
  selector:
    matchLabels:
      app: mte-relay-control-plane
  template:
    metadata:
      labels:
        app: mte-relay-control-plane
    spec:
      # The image runs as nonroot (uid/gid 65532) and CSI drivers commonly
      # mount a fresh volume as root:root 0755. Without fsGroup the control
      # plane cannot write to /data and the pod crash loops at startup.
      securityContext:
        fsGroup: 65532
      containers:
        - name: control-plane
          image: 321186633847.dkr.ecr.us-east-1.amazonaws.com/customer/on-prem/mte-api-relay:5.0.0-beta.1
          ports:
            - containerPort: 8081
          env:
            - name: MODE
              value: control
            - name: PORT
              value: "8081"
            - name: CONTROL_PLANE_DATA_DIR
              value: /data
          envFrom:
            - secretRef:
                name: mte-relay-control-plane
          volumeMounts:
            - name: data
              mountPath: /data
          # /healthz is unauthenticated and reveals nothing but liveness
          readinessProbe:
            httpGet:
              path: /healthz
              port: 8081
            initialDelaySeconds: 2
            periodSeconds: 5
          livenessProbe:
            httpGet:
              path: /healthz
              port: 8081
            initialDelaySeconds: 10
            periodSeconds: 10
          resources:
            requests:
              cpu: 50m
              memory: 64Mi
            limits:
              cpu: 250m
              memory: 128Mi
      volumes:
        - name: data
          persistentVolumeClaim:
            claimName: mte-relay-control-plane-data

---

# ClusterIP on purpose. The panel holds the license key and client secrets,
# so it is reached through a port forward or an internal ingress with TLS,
# never a public LoadBalancer.
apiVersion: v1
kind: Service
metadata:
  name: mte-relay-control-plane
spec:
  type: ClusterIP
  selector:
    app: mte-relay-control-plane
  ports:
    - protocol: TCP
      port: 8081
      targetPort: 8081
Then point the workers at it by adding two environment variables to the
relay container in mte-relay-deployment.yaml:
          env:
            # ... existing DOMAIN_MAP and REDIS_URL entries ...
            - name: CONTROL_PLANE_URL
              value: "http://mte-relay-control-plane:8081"
            - name: CONTROL_PLANE_TOKEN
              valueFrom:
                secretKeyRef:
                  name: mte-relay-control-plane
                  key: CONTROL_PLANE_TOKEN
Apply both files, then open the panel through a port forward:
kubectl apply -f mte-relay-control-plane.yaml
kubectl apply -f mte-relay-deployment.yaml
kubectl port-forward svc/mte-relay-control-plane 8081:8081
Sign in at http://localhost:8081 with the username admin and the password
from the secret. Workers appear on the Fleet page within a few seconds of
starting.
Kubernetes Commands
To deploy the application to your kubernetes cluster, run:
kubectl apply -f mte-relay-deployment.yaml
You can check the status of your deployment with:
kubectl get deployments
kubectl get pods
kubectl get services
To check the logs of a running pod, use the command
kubectl logs <POD_NAME>
To scale up the number of replicas, use the command
kubectl scale deployment mte-relay-deployment --replicas=<NUMBER_OF_REPLICAS>
To delete the deployment and service, use the command
kubectl delete -f mte-relay-deployment.yaml
Source: Kubernetes Deployments
Option D: OpenShift
Red Hat OpenShift runs standard Kubernetes objects, so the manifest from Option C is a valid starting point. Three OpenShift-specific differences need to be accounted for:
- Routes replace
LoadBalancerservices. Most on-premise OpenShift clusters have no cloud load balancer to provision, so a service oftype: LoadBalancerstays in a pending state indefinitely. OpenShift exposes services externally with aRouteobject instead. - Containers run as an arbitrary user ID. The default
restricted-v2security context constraint (SCC) assigns each pod a random UID from the project's range and ignores the image'sUSERdirective. Supporting images such as Redis need a writable volume mounted over their data directory as a result. - The
DOMAIN_MAPkey must match the hostname the relay is reached by. MTE API Relay selects the upstream using the incomingHostheader. For an inbound relay that is the route hostname; for an outbound relay it is the in-cluster service hostname.
MTE API Relay images already run as a non-root user and listen on port 8080,
so they run under the default restricted-v2 SCC without modification. No
elevated privileges, custom SCC, or service account changes are required.
1. Log In and Create a Project
Log in with the OpenShift CLI. A token is available from the web console under your user name, Copy Login Command.
oc login --token=<YOUR_TOKEN> --server=https://api.<YOUR_CLUSTER_DOMAIN>:6443
Create a project to hold the relay:
oc new-project mte-api-relay
2. Create an Image Pull Secret
OpenShift needs credentials to pull from the Eclypses ECR repository. Create a pull secret from an ECR authorization token and link it to the project's default service account:
oc create secret docker-registry eclypses-ecr --docker-server=321186633847.dkr.ecr.us-east-1.amazonaws.com --docker-username=AWS --docker-password="$(aws ecr get-login-password --region us-east-1 --profile eclypses-customer-on-prem)"
oc secrets link default eclypses-ecr --for=pull
ECR authorization tokens expire after 12 hours. The secret above is enough
for an evaluation, but any pod scheduled after the token expires fails with
ImagePullBackOff. For production, mirror the image into the OpenShift
internal registry or into a registry your organization already operates,
and point the deployment at that copy.
3. Look Up Your Apps Domain
Routes are published under the cluster's wildcard apps domain. Retrieve it so you can choose a hostname:
oc get ingresses.config/cluster -o jsonpath='{.spec.domain}'
This returns something like apps.ocp.example.com, which makes
mte-api-relay.apps.ocp.example.com a valid route hostname.
4. Create the Manifest
The manifest below deploys an inbound relay, which receives encoded
traffic from a paired outbound relay and forwards decoded traffic to your
service. Create a file named mte-api-relay-openshift.yaml:
# MTE API Relay configuration, held in a secret rather than inline in the deployment
apiVersion: v1
kind: Secret
metadata:
  name: mte-api-relay-config
type: Opaque
stringData:
  # The domain key must match the route hostname defined below. Update this value!
  DOMAIN_MAP: '{ "mte-api-relay.__YOUR_APPS_DOMAIN__": { "upstream": "__YOUR_UPSTREAM_URL__", "client_id_secret": "__YOUR_CLIENT_ID_SECRET__", "outbound_token": "__YOUR_OUTBOUND_ACCESS_TOKEN__" } }'

---

# MTE API Relay container deployment
apiVersion: apps/v1
kind: Deployment
metadata:
  name: mte-api-relay-deployment
spec:
  replicas: 2
  selector:
    matchLabels:
      app: mte-api-relay
  template:
    metadata:
      labels:
        app: mte-api-relay
    spec:
      containers:
        - name: mte-api-relay
          image: 321186633847.dkr.ecr.us-east-1.amazonaws.com/customer/on-prem/mte-api-relay:5.0.0-beta.1
          ports:
            - containerPort: 8080
          envFrom:
            - secretRef:
                name: mte-api-relay-config
          env:
            - name: REDIS_URL
              value: "redis://my-redis-service:6379"
          readinessProbe:
            httpGet:
              path: /api/mte-echo
              port: 8080
            initialDelaySeconds: 5
            periodSeconds: 10
          livenessProbe:
            httpGet:
              path: /api/mte-echo
              port: 8080
            initialDelaySeconds: 15
            periodSeconds: 20
          resources:
            requests:
              cpu: 250m
              memory: 256Mi
            limits:
              cpu: "2"
              memory: 1Gi

---

# MTE API Relay Service, reached from outside the cluster through the route below
apiVersion: v1
kind: Service
metadata:
  name: mte-api-relay-service
spec:
  type: ClusterIP
  selector:
    app: mte-api-relay
  ports:
    - name: http
      protocol: TCP
      port: 8080
      targetPort: 8080

---

# Route to expose the service outside the cluster
apiVersion: route.openshift.io/v1
kind: Route
metadata:
  name: mte-api-relay
  annotations:
    # Raise the router timeout so long-running responses are not cut off
    haproxy.router.openshift.io/timeout: 1h
spec:
  # Must match the domain key used in DOMAIN_MAP above. Update this value!
  host: mte-api-relay.__YOUR_APPS_DOMAIN__
  to:
    kind: Service
    name: mte-api-relay-service
  port:
    targetPort: http
  tls:
    termination: edge
    insecureEdgeTerminationPolicy: Redirect

---

# Redis container deployment
apiVersion: apps/v1
kind: Deployment
metadata:
  name: my-redis-deployment
spec:
  replicas: 1
  selector:
    matchLabels:
      app: my-redis
  template:
    metadata:
      labels:
        app: my-redis
    spec:
      containers:
        - name: redis
          image: redis:7.2
          ports:
            - containerPort: 6379
          volumeMounts:
            # Redis cannot write to the /data directory baked into its image
            # once OpenShift assigns an arbitrary user ID, so mount a writable
            # volume over it
            - name: redis-data
              mountPath: /data
      volumes:
        - name: redis-data
          emptyDir: {}

---

# Redis Service to expose the deployment
apiVersion: v1
kind: Service
metadata:
  name: my-redis-service
spec:
  type: ClusterIP
  selector:
    app: my-redis
  ports:
    - protocol: TCP
      port: 6379
      targetPort: 6379
The above configuration provides these resources:
mte-api-relay-config (Secret): Holds theDOMAIN_MAPvalue, keeping the client ID secret and outbound token out of the deployment manifest.mte-api-relay-deployment (Deployment): Runs 2 replicas of the mte-api-relay container on port 8080, with health probes against the echo route.mte-api-relay-service (Service - ClusterIP): Provides in-cluster access to the relay pods on port 8080.mte-api-relay (Route): Publishes the service on the cluster's apps domain with edge TLS termination.my-redis-deployment (Deployment): Runs a single Redis instance on port 6379 with a writable volume at/data.my-redis-service (Service - ClusterIP): Provides internal cluster access to the Redis pod over port 6379.
An outbound relay is called by your own services from inside the cluster and
does not need to be reachable from outside it. Omit the Route object, and
key DOMAIN_MAP on the service hostname your applications will call, such as
mte-api-relay-service:8080. Removing the route also removes the only path
into the relay from outside the cluster, which is usually what you want for
an outbound instance.
The emptyDir volume above keeps Redis simple for an evaluation, but its
contents are lost whenever the Redis pod restarts, and paired relays
re-pair. For production, replace it with a persistentVolumeClaim or point
REDIS_URL at a Redis service your organization already operates.
Adding the Control Plane on OpenShift
The admin panel runs on OpenShift the same way it runs on Kubernetes, with
two differences. Leave fsGroup out of the pod spec: the restricted-v2 SCC
assigns its own uid and fsGroup, and the control plane writes its volume
correctly under them. And do not put a Route in front of it. The panel
holds the license key and client secrets, so reach it with oc port-forward,
or with a route restricted to your internal network if your cluster has one.
Append the following to mte-relay-openshift.yaml. See
Control Plane for what the panel manages.
---

# Shared worker token and admin password
apiVersion: v1
kind: Secret
metadata:
  name: mte-relay-control-plane
type: Opaque
stringData:
  CONTROL_PLANE_TOKEN: "__YOUR_SHARED_WORKER_TOKEN__"  # Update this value!
  ADMIN_PW: "__YOUR_ADMIN_PASSWORD__"                  # Update this value!

---

# Storage for the override document and the admin session signing secret
apiVersion: v1
kind: PersistentVolumeClaim
metadata:
  name: mte-relay-control-plane-data
spec:
  accessModes: ["ReadWriteOnce"]
  resources:
    requests:
      storage: 100Mi

---

# Control plane deployment. Always one replica: the override document is a
# single file written by a single process, with no cross process locking.
# No securityContext here on purpose; the restricted-v2 SCC supplies one.
apiVersion: apps/v1
kind: Deployment
metadata:
  name: mte-relay-control-plane
spec:
  replicas: 1
  strategy:
    type: Recreate          # never two pods writing the same volume
  selector:
    matchLabels:
      app: mte-relay-control-plane
  template:
    metadata:
      labels:
        app: mte-relay-control-plane
    spec:
      containers:
        - name: control-plane
          image: 321186633847.dkr.ecr.us-east-1.amazonaws.com/customer/on-prem/mte-api-relay:5.0.0-beta.1
          ports:
            - containerPort: 8081
          env:
            - name: MODE
              value: control
            - name: PORT
              value: "8081"
            - name: CONTROL_PLANE_DATA_DIR
              value: /data
          envFrom:
            - secretRef:
                name: mte-relay-control-plane
          volumeMounts:
            - name: data
              mountPath: /data
          # /healthz is unauthenticated and reveals nothing but liveness
          readinessProbe:
            httpGet:
              path: /healthz
              port: 8081
            initialDelaySeconds: 2
            periodSeconds: 5
          livenessProbe:
            httpGet:
              path: /healthz
              port: 8081
            initialDelaySeconds: 10
            periodSeconds: 10
          resources:
            requests:
              cpu: 50m
              memory: 64Mi
            limits:
              cpu: 250m
              memory: 128Mi
      volumes:
        - name: data
          persistentVolumeClaim:
            claimName: mte-relay-control-plane-data

---

# ClusterIP with no route: the panel is reached through a port forward
apiVersion: v1
kind: Service
metadata:
  name: mte-relay-control-plane
spec:
  type: ClusterIP
  selector:
    app: mte-relay-control-plane
  ports:
    - name: http
      protocol: TCP
      port: 8081
      targetPort: 8081
Add two environment variables to the relay container in the same file so the workers start polling:
          env:
            # ... existing REDIS_URL entry ...
            - name: CONTROL_PLANE_URL
              value: "http://mte-relay-control-plane:8081"
            - name: CONTROL_PLANE_TOKEN
              valueFrom:
                secretKeyRef:
                  name: mte-relay-control-plane
                  key: CONTROL_PLANE_TOKEN
Once you deploy in the next step, open the panel with a port forward:
oc port-forward svc/mte-relay-control-plane 8081:8081
Sign in at http://localhost:8081 with the username admin and the password
from the secret.
5. Deploy
oc apply -f mte-api-relay-openshift.yaml
Watch the pods come up:
oc get pods -w
Confirm the route is published:
oc get route mte-api-relay
OpenShift Commands
The oc CLI is a superset of kubectl, so the Option C commands work
unchanged. The commands below cover the OpenShift-specific objects.
To view the hostname assigned to the route:
oc get route mte-api-relay -o jsonpath='{.spec.host}'
To check the logs of a running pod, use the command
oc logs <POD_NAME>
To scale up the number of replicas, use the command
oc scale deployment mte-api-relay-deployment --replicas=<NUMBER_OF_REPLICAS>
To confirm which security context constraint a pod was admitted under:
oc get pod <POD_NAME> -o jsonpath='{.metadata.annotations.openshift\.io/scc}'
To delete the deployment, service, and route, use the command
oc delete -f mte-api-relay-openshift.yaml
- Pods stay in
ImagePullBackOff: the ECR token has expired, or the pull secret was never linked. Recreate the secret and re-runoc secrets link. - Requests fail with
No proxy destination found for host: the hostname the relay was reached by and theDOMAIN_MAPkey do not match. Compare the output ofoc get route mte-api-relay -o jsonpath='{.spec.host}'against the key in the secret. - The service never receives an external IP: the service is still
type: LoadBalancer. Change it toClusterIPand expose it with a route. - Redis logs persistence errors: the writable volume at
/datais missing from the Redis deployment.
Source: OpenShift Routes
Usage Guide
To use MTE API Relay, simply redirect your application's HTTP requests to the Outbound Relay instance and include the required x-mte-* headers. The Outbound Relay will handle encoding the request, forwarding it to the Inbound Relay, and decoding the response before returning it to your application.
Outbound Request Headers
When sending a request to the Outbound Relay, include the following headers:
x-mte-outbound-token: The outbound token configured in the Outbound Relay.x-mte-upstream: The URL of the upstream service, from the perspective of the Outbound Relay. It should be an Inbound Relay URL.
Example Request
Before using MTE API Relay, a normal HTTP request would look like this:
curl -X GET https://api.my-company.com/data
After setting up MTE API Relay, the request to the Outbound Relay would look like this:
curl -X GET https://outbound-relay.my-company.com/data \
  -H "x-mte-outbound-token: __YOUR_OUTBOUND_TOKEN__" \
  -H "x-mte-upstream: https://inbound-relay.my-company.com/data"
- The
x-mte-upstreamheader should point to the Inbound Relay URL, not directly to the backend service. - Only the Domain portion of the URL needs to be updated. The path of the URL can remain the same.
Testing & Health Checks
- Monitor container logs for startup messages
- Use the default or custom echo routes to test container responsiveness:
- Default:
/api/mte-echo - Custom Message:
/api/mte-echo?msg=test
- Default:
Expected response:
{
  "message": "test",
  "timestamp": "<timestamp>"
}
Troubleshooting
- Invalid Configuration
- Check logs for missing/invalid environment variables.
- Relay unreachable
- Verify firewall, networking, or Kubernetes service configuration.
- Redis connection issues
- Ensure
REDIS_URLis reachable in your environment.
- Ensure
- Cannot Reach Upstream Service
- Verify the container can resolve and connect to the target host.
Security
Container Hardening
MTE API Relay is built and hardened using the following practices:
- Minimal base image — The runtime image uses Google's
Distroless
cc-debian12base. It contains only the application and its runtime dependencies — no shell, no package manager, and no general-purpose OS utilities — which dramatically reduces the attack surface. - Multi-stage build — The application is compiled in a separate
golangbuild stage. Build tooling and source never ship in the final image; only the compiled binary is copied forward. - Non-root runtime — The container runs as a dedicated unprivileged
user (
nonroot). No root privileges are required at runtime. - Minimal surface — Only port
8080is exposed, and the image runs a single binary entrypoint. - No persisted secrets — No sensitive data is stored in the container; all configuration is supplied at runtime via environment variables.
- Network isolation — Recommended to deploy close to the upstream service to minimize exposure of unencrypted traffic.
Vulnerability Scanning
Container images are scanned for known vulnerabilities with Docker Scout prior to release. Scan reports for the current image tag are available from Eclypses Support on request (see Support).
Because the on-premise image is distributed through Amazon ECR, customers can also generate their own native scan evidence by enabling Amazon ECR enhanced scanning (AWS Inspector) on the image they pull. The pulled image can equally be scanned with any container scanner of your choice (e.g. Trivy, Grype, or your existing CI/registry scanner) to produce evidence within your own environment.
Costs
Private infrastructure costs (VMs, storage, networking, Redis clusters) are customer-managed. No AWS charges are incurred for on-premise usage.
Maintenance
Release Cadence
Updated container images are published on an as-needed basis — when new
features, dependency updates, or fixes warrant a release. Security patches
are issued out-of-band as needed and are not tied to a fixed calendar
cadence. Each release is versioned (see the image tag, e.g. 5.0.0-beta.1) and
distributed through Eclypses' Amazon ECR repository.
Patch SLA
Eclypses' commitment for security patches:
- Critical vulnerabilities are addressed in a patched image within 30 days of confirmed disclosure.
- Lower-severity issues are addressed in a subsequent release.
To receive an updated image, pull the latest tag from the Eclypses ECR repository and redeploy your container.
Fault Recovery
- Relaunch the Relay container; paired API Relays will automatically re-establish secure communication.
Key/Variable Rotation Recommendations
- Rotate the
CLIENT_ID_SECRETandOUTBOUND_TOKENevery 90 days as per security best practices.
Support
MTE API Relay is a commercially supported product from Eclypses.
Support and security-patch SLAs (including the 30-day critical-patch
commitment described under Maintenance) are provided to
licensed/subscribed customers. For escalations, scan reports, or hardening
documentation, contact Eclypses Support:
📧 customer_support@eclypses.com
🕒 Monday–Friday, 8:00 AM–5:00 PM MST (excluding holidays)